[s2If current_user_cannot(access_s2member_ccap_course_002_bt)]
To view this lesson, please purchase this course or log in if you have already purchased it.[/s2If]
[s2If current_user_can(access_s2member_ccap_course_002_bt)]
Week 4
- BAT Set-Ups (why, what helpers do, safety, picking the right space)
- Do a BAT Set-Up
TIME TO REHEARSE
In the last lesson, you practiced your survival skills, so now hopefully the reactions on walks have decreased in frequency and intensity. Keep thinking about how you can help your dog avoid over threshold moments on walks and in your everyday life. In the meantime, let’s get started with the BAT set-ups, where your dog can really practice being boring around his trigger.
Note that I wrote “bor-ing,” not “bor-ed.” The dog himself should be having a fairly good time, in a relaxed way. But to anyone watching you train, your dog is just going to be walking around sniffing things. Boring.
WHAT DO BAT SET-UPS LOOK LIKE?
As I mentioned before, BAT set-ups are rehearsals for relaxed behavior.
Using the ocean analogy from Lesson 2, our dog can wander around the “beach” (no big interest in the helper), even occasionally approach the “shoreline” (show interest in the helper), but you will not let him step into the “water” (stressed, too focused on the helper). We want the dog to be curious about the helper, but not showing signs of fear, frustration, or aggression.
Please do not share the above image or post online 🙂
Now that you know the leash skills and you understand the ocean analogy for body language, set-ups are only a matter of putting that information together.
BEFORE YOUR SET-UP:
- Practice leash skills until you feel comfortable doing them anywhere.
- Practice Mark & Move and other survival skills. Make sure to include just using “Done?” as a marker (question to the dog) and praise after moving away. No tugging on that leash as you leave!
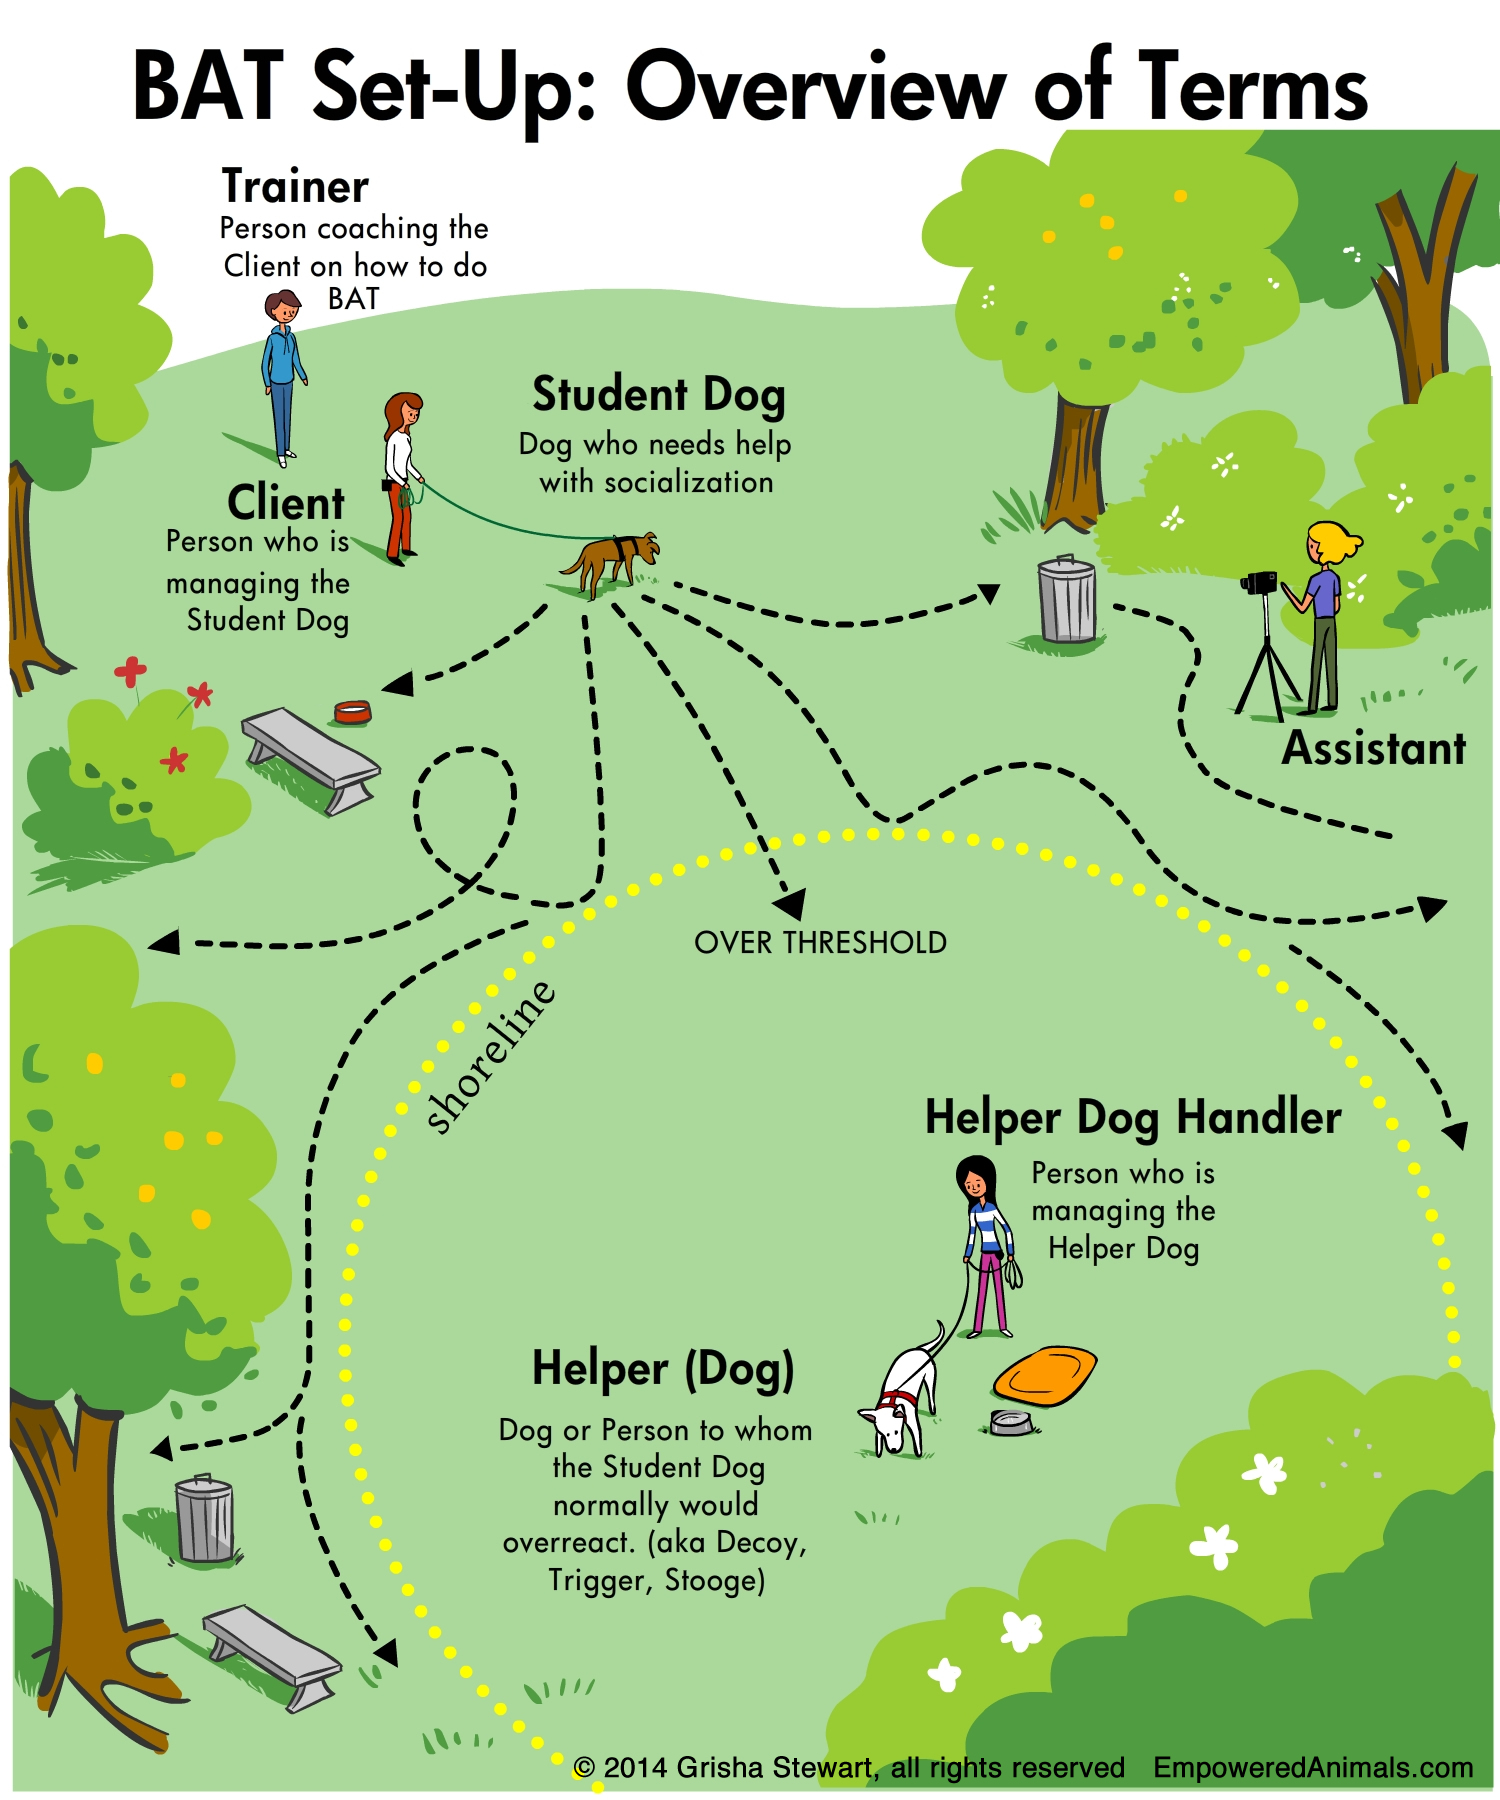
- Pick an area that is interesting to your dog. Bushes, trees, smells, hills, etc. No scary sounds or other triggers. Your dog will probably give more relaxed, exploratory behavior at the edges of such an area, rather than in the center of a field. As your dog gets more advanced and you can work up close, an area with a chain-link fence would be useful, so you can work with that between the dog and the helper.
- Have a friend meet you there to be the helper (with a dog if that’s your dog’s issue). Your dog shouldn’t come into contact with the helper until you are ready – meaning your dog has had a chance to explore the space and calm down first.
- 2-way radios or mobile phones are useful for staying in touch without needing to shout. If you use a phone, call at the beginning and lease the connection open.
- (optional) Exercise your dog a bit before by going on a walk in a place where triggers are unlikely, searching your back yard for treats, etc. Fetch isn’t the best option because it is such an exciting activity and that can contribute to trigger stacking during your session.
- Bring a stuffed food puzzle.
- Bring fight break-up equipment. I have never needed it during a set-up but I bring Spray Shield every time, just in case.
SETTING UP:
Once you get to the space where you will do your set-up, take a look around and make sure it’s still a good place for your dog to work.
- Calmly attach the harness and long leash before going outside (i.e., inside the car or your house). Double-check that the dog will not slip out of the harness and that you are in basic position (so no leash on the ground) before the dog gets out of the safe place.
- Toss some treats on the ground before your dog gets out of the car. (This can be done in advance or you can also use Sprinkles, just not every time).
- Let your dog out of the car to find the treats and then explore the area for about 5-10 minutes. This includes the tripod (if you have one) or camera person.
- Walk away or distract your dog for a bit and get the helper into position. This should be so far that your dog would not go running over there or try to avoid the helper, but just notice and move on with exploring.
- The helper can act normally (dog sniffing for treats, human relaxed and interacting with the student dog handler) if the student dog can handle that. If not, move farther away or have the helper be more stationary, turned away, etc.
If your dog is very focused on the helper, you are too close. Encourage movement away, do find it, turn the helper away, etc. and set up again at a better distance.
DOING BAT
Here is a video of Jennie Murphy, CBATI doing a BAT set-up in Newfoundland, Canada. Listen to the instructions that Jennie gives to her client as well.
BAT steps:
- Let your dog explore the area (including the trigger) on a loose leash. Stay out of the way!
- Slow stop if your dog walks directly at the trigger (or otherwise seems too focused)
- Go back to step one – walking any direction except for right at the trigger is okay.
Over time, your dog will probably wander closer and closer to the trigger, but never in a straight line. In this week’s set-up, don’t go close enough for your dog to reach the helper, even if you think he’s ready. I want you to know what to do and be absolutely sure that it will go well before we take that step.
In the chart below, doing BAT right is the green loop or the blue one. The colors match the ocean chart from the body language lecture. If you are too close, you end up crossing the shoreline into the water, and we have the yellow or orange from this chart.

The yellow zone here is when your dog takes a while to disengage, but is still sniffing, mouth open, the heart rate isn’t particularly high, and you start to see little signs of disengagement, like ears relaxing or twitching. In that case, WAIT for disengagement, and then prompt a move away. So the only difference between this and the ‘correct’ version of BAT is that you don’t just follow the dog after. We assume that if it took so long, the dog is slightly magnetized and may not make ideal choices on his own. We suggest the move away after disengagement in the yellow zone because it may not occur to the dog. This is an example of Mark and Move because we say “Done?” or “Yes” when the dog disengages, move away, and praise.
The ‘darker’ yellow and orange parts on the chart are when we have really gone too close and don’t think the dog will disengage on his own. The dog needs help anywhere from a shift of your weight to a full recall cue. For example, if slow stop was too difficult or the dog is getting taller, etc. you’d call the dog away. Mark and Move and other survival skills are handy here.
Let’s recap:
Manage the activity and distance of the helper to keep your dog’s stress level low. If you do that well, he will keep himself out of the “water.” You can just stay out of his way. This empowered exposure lets him learn that the helper is not a threat (even possibly fun) and that he can explore and move away. If your dog is used to interacting and needs a verbal connection to normalize the situation and keep his stress level low, calmly talk or pet him for a bit when he checks in.
If you see your dog walk directly toward the helper at any point, think of that as reaching the shoreline. Slow your dog to a stop at the shoreline, giving him a chance to calm down, gather information, and decide what he wants to do next. After your dog comes to a full stop, relax the leash so that the leash makes a U-shape or “smile” between you and your dog. This allows him to decide what to do next without added tension from your leash.
When your dog is done looking at the helper, he will disengage, meaning that he turns away, stops focusing on the helper, etc. The most obvious behavior here is a head turn and a shift of his weight. Praise (optional) and follow him on a loose leash in whatever direction he goes, except for directly at the helper. If your dog immediately starts to go directly toward the helper again, he is too focused and needs his lifeguard, so call him back and try again from farther away.
AFTER THE SET-UP
Knowing when to stop can be tricky, because humans are generally ‘greedy’ and want to keep training. 🙂
Keep an eye on your dog’s interest in the activity. Try to avoid ‘training to the point of failure’ but if your dog wanders away, shows signs of stress, etc. then stop the session or take a break. Toward the end of your set-ups, while things are still going well, you can move to an even greater distance so things are very, very easy for your dog. Following the helper from far away is a great way to finish up a session. A walk ‘together’ — at the right distance — can be pleasant and social, a chance to continue to learn in a relaxing way.
You could also do something like a casual Find It or feed your stuffed food puzzle to your dog in that location or in the car. The idea here is just to have a relaxed and pleasant way to finish up the session that doesn’t take away from the lessons your dog has just learned.
So basically you have a sort of BAT menu:
- Appetizer: Find It
- Main: BAT set-up (follow your dog around)
- Dessert: Fun activity with the helper, Stuffed puzzle, or more Find It
[/s2If]