This is a video series of the second half of a set-up that I did with Bean. We walked with two dogs, starting out by following them on a trail through the woods. After a while we were able to be closer. This is from the second half, where one of the dog handlers is also filming. Her dog has issues with people, so you’ll see me keep Bean from approaching some of the time.
In this set-up, I am using Mark and Move and transitioning into BAT 2.0 (without prompting). In the early part, I call him away quickly. Initially it was after just a moment of sniffing, but that was before the camera came on.
Please keep working with your dog on all of the activities you learned in the course. Each dog and situation goes at its own pace but if it’s going to slow, consider hiring a CBATI to help coach you. You can keep working and check back here any time.
If you haven’t already signed up for membership, consider doing so because it is a great way to stay motivated. One thing members get is access to the ABBA Facebook group. You can post videos and ask/answer questions in a discussion with your fellow ABBA members. The group is moderated to keep the conversations on track.
Keep filming your set-ups so that you can look back to see how far you have come. As you review your videos over time, focus on where your dog has improved, how you have improved, and what your dog can do now that wasn’t possible at some point in the past.
Find two unofficial videos of BAT on YouTube. Watch on a minute each one, and look at each of them from the perspective of what you could do differently to help the dog succeed, and whether it really looks like BAT. Feel free to actually comment on the YouTube site – politely of course. 🙂
Do parallel walking or following as part of a BAT 2.0 set-up. Most set-ups should have this natural sort of movement whenever possible. For your records and your further education, pick a particular section to focus on. As usual, pay close attention to the dog’s body language and note any points where the session could have gone better (and how). For example:
Was the dog in the green and blue zones only?
Was the environment enriched enough?
Were you able to stay out of the dog’s way or did you accidentally lead the dog toward the trigger?
How were your leash skills?
Pretend your area is too small, your dog is a little bored, etc. so that you need to use the Parallel Play variation, just to practice. Still don’t lead your dog toward the trigger. Have your dog do some activity at the same time that you are doing BAT.
When you start to do close-up work, be safe and only do it when your dog is ready.
Do a BAT Set-Up (submit video & written assessment)
UP CLOSE AND PERSONAL
My favorite part of BAT is when we are able to get the dog on social terms with the helper, easily and at the dog’s own pace. That may mean they actually get to the point of playing with the other dog or enjoying petting if the helper/trigger is a person.
Sometimes we have to work up close because there is no other option. For example, in the winter cold or hot summer sun, some clients are unwilling or unable to work outside, so you only have a training building to work in. Or you may just be too close because there is no other option in your city. “Close” is defined by the dog, so it may be that you have a large area, but the dog needs an even bigger one.
These times require some more creativity, and we’ll talk about that below.
GREETINGS WHEN THE DOG IS READY
It’s pretty exciting when the dog is ready to work up close. It means our sessions are paying off and the interactions are going great, but it’s also riskier, because the teeth are closer to the trigger and the dog’s emotional state can change more quickly. You may get to the point of working up close within one session with your helper, or it may take multiple sessions. But if it’s possible and safe, definitely do the up-close work with as many of your helpers as you can.
For dogs who are scared, a positive social experience can change the valence (direction of the emotion). That is, having a good experience can help him enjoy other dogs or people. For dogs who react out of frustration, working calmly up to the other dog/person allows them to experience a calm greeting. A lot of frustration seems to come from insecurity, as well, and this process builds quiet confidence.
If the issue is more predatory in nature, a full-on greeting is probably not a good idea, although the slow, careful BAT process can give dogs a chance to see cats, for example, in a social way instead of seeing them as food. A dog who has predatory behavior toward small dogs, for example, would benefit from a casual walk with a fence in between for safety. As I mentioned with cats, it seems to help them integrate that size of dog into the ‘social’ category.
My BAT book has information on the last 10 feet that still apply (even though the book is about BAT 1.0 until I revise it). If you have that book, go ahead and reread that section. I will cover as much as I can here as well.
Work on important triggers from a distance first. Even if your dog is great with the trigger at a distance, moving closer is a big deal. Your dog’s likely to react up close to things like eye contact, movement (especially if it’s sudden), freezing, sounds from the helper, etc. if you don’t work on those aspects of the trigger from a distance first. When you try something new and potentially freaky, move the dog away first, then have the helper do the new thing, and give the dog the option of going back again at his own pace.
I recommend going through a lot of these kinds of variations up through about 10 feet away from the trigger, moving back, doing another one, etc. That allows you to get a lot of variation out of ‘striking distance’ and gives you a little leeway if you mess up. We still want the dog relaxed and below threshold.
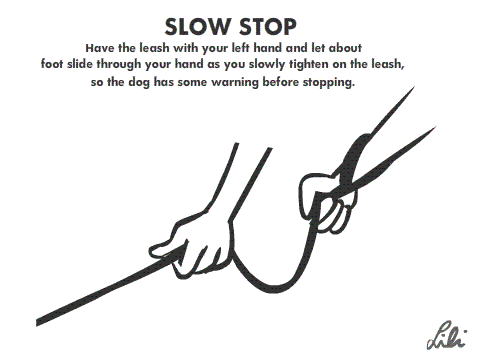
Vary your set-ups so that there are things like parallel walking, following, and approaching from different angles. Parallel walking isn’t really parallel because the paths of the helper and the dog should be natural and curvy, allowing free movement, not just side by side. When you do following, use your own judgment on when to do a slow stop, because (of course) the dog is walking right toward the helper, because that’s the direction they are already both walking. If your dog suddenly starts moving more quickly or gets taller, that’s a sign that you’re probably following too closely.
Safety is key. When you are confident that the dog would be comfortable moving in for a sniff and you’re seeing signs of curiosity (soft, curved body, relaxed muscles in the face, etc.), use some simple management tools to ensure safety.
For example, have a chain-link fence between the dog and helper if you are doing parallel walking, following, or walking up for a sniff. Other kinds of fences or even bushes can add some safety too, but it is riskier if the dog’s jaws or whole head can go through the barrier.
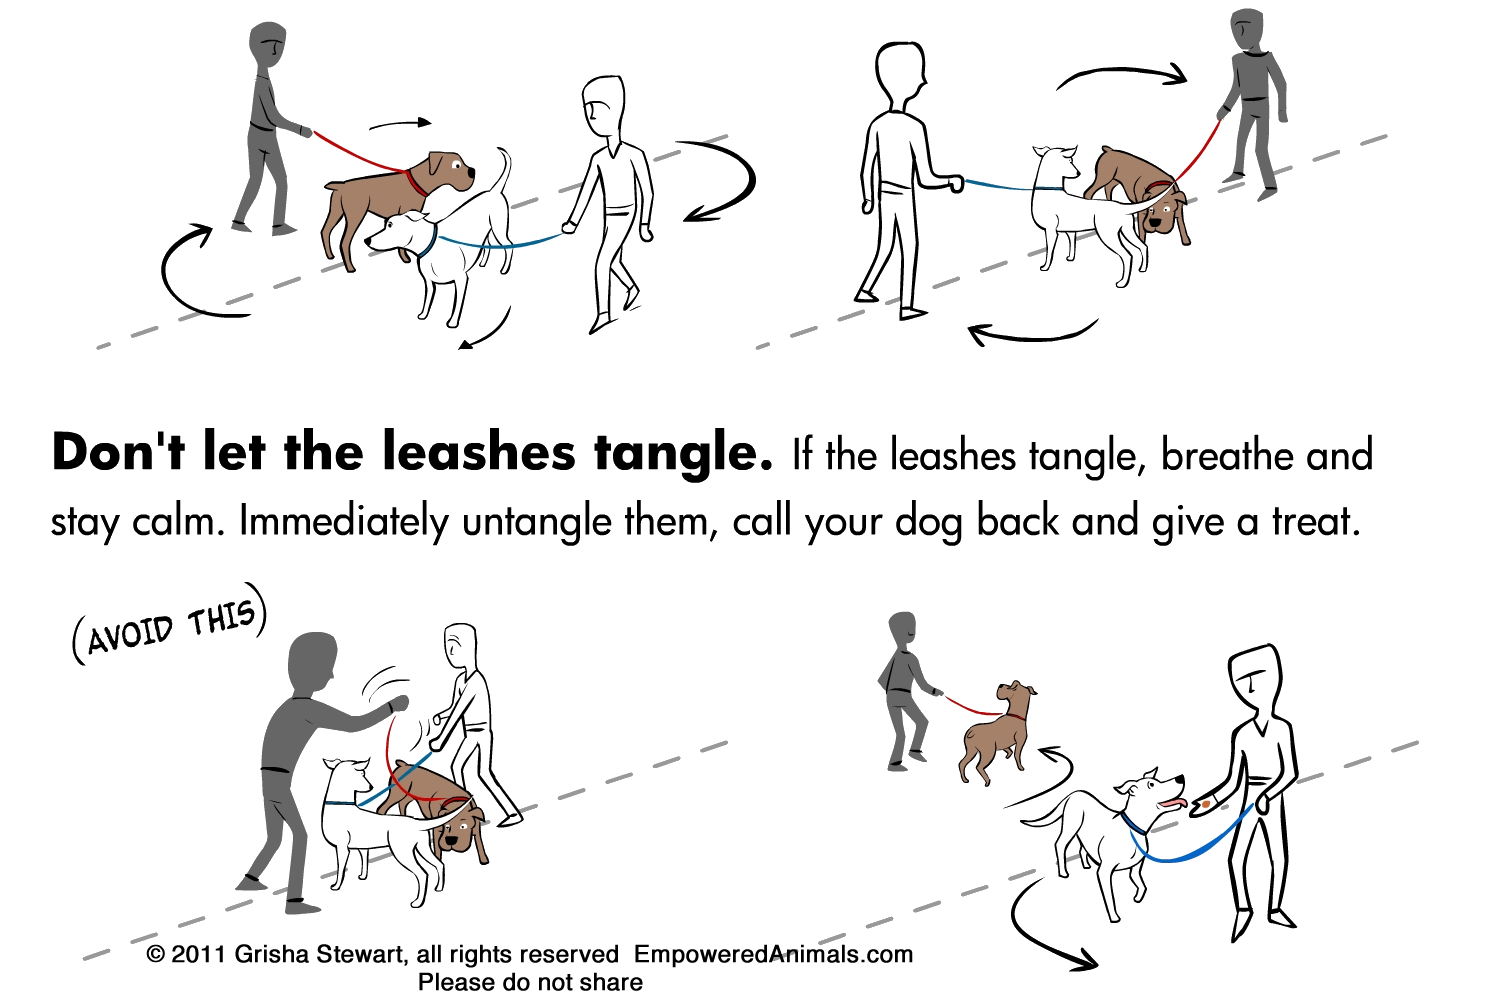
Fences are nice for greetings between dogs because they make it so the leashes can’t tangle. Before you begin doing greetings without the fence, make sure that you are able to properly do the “leash dance” where you keep only the leash between you and your dog.
One way to make this happen is to stand in a particular position relative to your dog (say, at your dog’s right side, toward the rear), and stay in that position no matter what. It’s like heeling except you’re doing it. If you are a dog trainer working with a client, this is good to rehearse before you allow your client to handle the leash during up-close work. As an aside, the leash dance is also good to practice in puppy class.
Click to Enlarge
A muzzle is like a fence for the dog’s teeth. Some people say that if you need a muzzle, you are too close, but I totally disagree. I think dog trainers do our clients a disservice if we say that. We should only be working at a distance where we think the dog will be totally fine. BUT we are humans and make mistakes. The cost of that mistake is high, especially for the dog. So even if we are 99.999% sure that it won’t happen, we need a fail-safe. That’s where the muzzle comes in. It’s like a helmet for human sports. Train your dog to get used to it and use it whenever necessary, in order to expand the type of activities that are safe to try.
If I have a client dog who is totally wiggly and wants to greet a child, but has a bite history or any indication in the history that biting is possible, that dog is going to be wearing a muzzle for the first several greetings (or there will be a fence in between).
It’s so much easier to get helpers when they know that there’s safety in place. If I go rock climbing outdoors, go skiing, or go biking, I’m going to do what I can to not need my helmet, but I’m certainly going to wear one. If I have a dog with a potential for biting, there will be safety in place (like a muzzle) for close-up greetings, even though I’d only do the greeting if I thought the dog was ready for it.
Keep it moving. Dogs tend to have better greetings if they do them on the move. It’s like paying attention to where they are walking takes some of the stress off of the meeting. I think it also helps prevent freezing, or at least reduces it. Walking as they sniff also makes it easier to keep them from starting out face to face. Face to face is definitely the riskiest way to greet; nose to rear is usually much more successful, starting with the dog who has issues sniffing the helper.
Another reason I like having the initial greetings be part of a parallel walking or following scenario is that it is easier to get the dogs apart if you see any tiny signs of stress. They were already moving, so the one who is ahead just keeps moving and the one who is behind stops. Voila! The dogs are moved apart.
Short sniffs and call away. Mark and Move is great for the first part of your greetings. This is the part of BAT that’s probably the most similar to regular clicker training. Make sure to have enough time away after each time that you move away, and don’t lead the dog back. Let the dog be the one that wants to go back in to see the helper.
Here’s how I tend to do things. This applies to fear, frustration, and proper aggression, although I’ll spend more time using treats for the latter two issues.
Mark going in to sniff with a click, move away, and treat [gradually start clicking later]
Mark looking away (or other small disengagement) with a click, move away, and treat
Mark head turn with a click, move away, treat
Mark head turn with “done?” move away, praise
“Proper” BAT 2.0 with just following the dog and avoiding tangled leashes
Fade out Mark and Move asap using the steps above. For most dogs, who reactivity has a component of fear, I need something like 5-10 clicks worth of sniffing (building up duration), then about 5 for looking away, 5 for turning away, and then go without the food. The sooner we can make the greeting be about the interaction between the dog and the helper, the better – with the caveat that we only allow dogs to be in situations that we think they can handle.
Extend the greetings. As you do your Mark and Move, you’ll gradually let the dog be ‘on his own’ for longer and longer periods of time. So at first you might click the instant that the dog goes toward the other dog’s rear end. Do that twice and then click later, after a ½ second of sniffing, then 1 second, then 2, etc. This applies for all issues. It’s either a calm, controlled greeting for a dog with impulse control problems, or a calm, not-scary greeting for a dog with fear issues. Either way, short and successful greetings are a good thing.
In this video, I am working with Bean using a recall cue and moving away when he’s ready, then treating. You would want to fade out the treats, as I’ve done somewhat here.
End on a good note! We humans tend to be greedy trainers and want to get our dogs closer and closer to the trigger. Sometimes they don’t want to, and that’s just okay. If they greet for a short period and move on, that’s also okay. Try to end your session while they are still nicely getting along and your dog is not yet saying, “I’m done.” If he does say he is done, listen! For example, park your car close to your set-up location, so your dog can head back to the car when he’s ready to go.
I like to have the last 5-10 minutes of a session be parallel walking or following at a distance that I know for sure the dog is totally fine with, as in ‘very light green’ on the ocean chart. That way, the dog and owner both have time to process and have a chance to have a positive experience in the presence of a trigger. Your choices are really endless, but finishing off with a pleasant activity is useful for owner morale and for the dog as well. Just make sure you don’t lure the dog into a place where he feels uncomfortable by having the helper feed him, for example. If you have a human helper and you do want to have them feed the dog, use Suzanne Clothier’s Treat and Retreat instead of just feeding from your hand. A super-short summary of her technique is to toss one treat to where the dog is and then the next behind the dog so he retreats. Repeat. The key is to not lure the dog forward, but to reinforce where they get to and then help them move away so they can choose to come back.
TRAINING IN A SMALL SPACE (including tight spots in the city)
If the dog isn’t really ready for working at the distance you have available for your set-up, you have a couple of options, which are basically the same as the Survival Skills we talked about earlier in this course:
“out of sight” (reduce stimulation level)
“out of mind” (reduce attention to the trigger using distraction).
Out of Sight: This is the best option because it maximizes the dog’s control in the situation and lets her practice decision-making. Change the more distant ‘antecedent arrangements’ by doing something that makes the helper less scary or exciting. This can be done by having the trigger behind a barrier, sitting or lying down, facing away, etc. or reducing the dog’s general arousal via exercise, diet, medication, etc.
Out of Mind: This is all about getting the dog to think about something else so that the dog is able to show calm(ish) behavior around the trigger. This works to keep the dog calm during training, but in my experience, it slows things down if your goal is for the dog to be comfortable in the world without micromanagement from you. This could be for a number of reasons, but one of them is that the tools we use to distract the dog (food, verbal cues, etc.) are often context cues and without those cues, the dog resorts back to the old behavior.
Mark and Move, which we discussed in Lesson 3, is a combination of out of sight and out of mind.
Behavior (yay, dog does something, learns his behavior is effective – requires setting up the situation carefully so the behavior happens)
Mark (out of mind – as soon as the marker happens, the dog is more distracted)
Move Away (out of sight – reducing arousal level by moving away, may reinforce behavior)
Reinforce (out of mind – reinforcer is distracting and reinforces earlier behavior)
Whenever possible, arrange your set-ups so that your dog can just do ‘regular’ BAT without any aspect of distraction. If that’s not possible, at least arrange it so you can use Mark and Move with the least distracting/intrusive combination of behavior, marker, and reinforcer.
Parallel Play is another combination of ‘out of sight’ and ‘out of mind.’ Basically, the dog is doing something interesting while BAT is also happening. The regular version of BAT, following the dog around as he investigates an interesting environment, is an example of parallel play. That’s my preference because it’s the most natural and seems to promote generalization (it works in other situations). Other examples include Sprinkles, massage, TTouch, clicker training, agility, scent work, and Treibball.
When using something like a scent game or activity, be aware of potential resource guarding or frustration issues as well, and make sure to keep both dogs within their comfort zones.
There’s a fine balance between mood and distraction. Improve your dog’s mood and keep him calm, but don’t distract him so much that he barely notices the trigger. This is one of the potential risk with parallel play. And remember, while you do these activities (or really, any activity in your dog’s life), you are still doing BAT: let the dog check out his environment, slow stop if needed, and don’t bug him to go back to work unless he’s headed over threshold.
Dogs in ‘working mode’ can almost always go closer to the trigger without exploding, so it comes in very handy. It’s just not as useful for changing the emotional response to the trigger or fixing the issue long term, so try to find a nice big, interesting space so that you can do BAT without needing to have the dog in working mode.
Compare the old BAT video of the horse (from the notes in the last lesson) with how BAT is supposed to be done today. What is different and why?
Find a video of training online (clicker, traditional, BAT, counterconditioning, etc.) or find non-BAT videos of you with your dog. Focus in on 1-2 minutes of each one, and look at it from the perspective of troubleshooting as if it were BAT. It doesn’t have to be a BAT set-up, it could be another kind of training that you look at through the lens of BAT.
Time for another set-up! You’ll end up doing many of them, assessing yourself each time to see if it could be done better. As before, film this for yourself and go over the video.
Find the most successful part of your BAT set-up, meaning the part that looks the most like BAT as I’ve described it, with the dog in the green or blue zones. Note your dog’s body language, what you did or what happened before the session (or didn’t) that helped this go well, and anything that could still be improved. Keeping a written record of this for yourself will help your training improve. Plus you can go back to it later and see how far you’ve both come.
Pick some moments from your set-up that could have gone better. In the notes for your future self, comment on what happened and what you could have done to improve the situation.
The perfect version of BAT is boring to the casual observer, with the dog in the green or blue zones on the ocean chart. Sometimes things go wrong and we need to change them to help set the dog up for success.
Good socialization (and re-socialization) really comes down to micromanaging the situation versus micromanaging the dog. Whenever you can set the dog up for success just by changing the environment, do it. That option empowers our dogs by giving their behavior realistic consequences. Micromanaging the dog just empowers us.
Our general rule of thumb is to use the least intrusive tool that helps the dog offer appropriate behavior. We are teaching the dog that she can handle (and even enjoy) these situations by setting up scenarios in which she is comfortable.
That means working farther away from the trigger or reducing how exciting the trigger is, so that your dog can navigate the situation without your obvious help. Sometimes it means stepping in and making the decisions for her (calling the dog, luring away with a treat, etc.) but if that happens, it means you need to reassess what you are doing and come up with a better way for your dog to be successful without you making decisions for her.
WHAT COULD POSSIBLY GO WRONG?
If your dog looks at the trigger, disengages quickly, and then just stares at you without going anywhere, your dog is in ‘working mode.’ Some dogs need more direction than others and freely wandering around the space may feel unusual or uncomfortable.
Walk near interesting smells, so he can take his focus off of you. If you are working in a field, go to the edges of the field or to trees and bushes, where there are better smells. You can also casually drop treats behind you so that your dog can discover them later.
Later, do some wandering walks with no triggers around, using the same trick of casually scattering treats mentioned above. You should have already done them at this point in the course, but you may need to do more.
The dog may be stressed and looking to the handler for help. In that case, regroup and start again farther away from the helper.
[vc_video link=”https://vimeo.com/135901999″]
If any of the following situations happen, you are probably waiting too long to stop your dog. Whenever you have to prompt the dog away from the trigger, go far enough away that he doesn’t glance back right away. If you use a recall cue, move your dog away from the helper and then always reinforce your recall cue, say by tossing some treats on the ground.
If it’s difficult to stop your dog in the first place, he’s already in over his head, so call your dog away. I like “Treat Party” as a recall cue, which I reinforce with many treats tossed on the ground, one at a time. “Touch” is also a good behavior to do here.
If he walks directly toward the helper again after disengaging, call him away, unless you are really sure that he is relaxed enough to handle it.Most of the time when this happens, the dog is too focused on the trigger and at least a few steps into the water.
If it takes your dog more than 2 seconds to disengage, his toes are in the water. Don’t take control right away, but you will suggest where to go next using Mark and Move.
Relax and wait for him to disengage on his own, then suggest that he move away, using the right level of intrusion (control/prompting).
If your dog was air-scenting (gathering info) and pretty relaxed, prompt in a small way by shifting your weight away from the helper.
If turning away was a little challenging, use a more obvious prompt: ask aloud if he’s “Done?” and shift your weight away from the helper. [The old Stage 3]
If he’s getting more excited while you wait (face muscles tight, taller, up on toes, breathing faster, heart rate going up, mouth closing, leaning toward the helper, spine pointing directly at the helper, chest puffing out, ears forward, tail up, forehead wrinkled), call your dog away! He’s moving deeper into the water at this point, so you can’t give him time to check things out.
Most dogs seem to be drawn to the helper in some way. For one thing, they are a social species and tend to be interested in people and dogs in one way or another. That’s certainly the case for dogs with frustration issues, but even for dogs who are afraid, curiosity tends to take over if they are at a safe distance. Furthermore, learning about something that is scary makes it less scary, so there is a good reason to get close enough to gather information.
The dog should gradually be getting closer and closer to the trigger. Make sure your dog is the one who drives the approach. Don’t get greedy! It’s a slow process, especially the first several times. You might even start out at one distance and then realize you actually have to be farther away. In the beginning of your sessions, you are experimenting to find the right working distance. That’s critical: working at the right distance is the most reliable way to help your dog overcome these issues. Throughout each session, continually evaluate to make sure the distance or excitement level of the helper is at the right level to keep the dog in the green or blue zones.
If he completely ignores the trigger, you are too close or too far away, the area is way too interesting, or he just hasn’t noticed the trigger yet. Here are some options:
Walk him further away. If he starts to look up at the helper at that point, you were too close before.
Jingle tags for helper dogs or have helper humans say something to make sure he knows the helper is there.
Sneakily put down some treats so that as he searches for the food, he works his way closer to the helper. Just make sure he doesn’t sniff his way up so close that he is shocked and starts barking when he notices the helper for real. DO NOT lure him into a situation that he’d consider to be dangerous or scary.
OTHER TROUBLE
Controlling handler: Please burn this one into your memory!
Another thing that can go wrong in a BAT session is that the handler has a plan for what is supposed to happen, so she leads the dog around instead of letting the dog guide the process. I am guilty of that myself – in fact that was part of the early version of BAT.
In the older version of BAT, we would retreat and then walk back when the dog looked relaxed and ready. We always were watching for signs of stress, but because dogs tend to follow us (reinforcement history) we often led them too close to the trigger. This wasn’t done by force, but still, it was a problem because we often brought the dogs into the yellow zone. Take a look at this video for an example of that:
[vc_video link=”https://vimeo.com/135890865″]
A final note: If your dog barks, growls, tries to flee, etc. you are clearly way too close! Move away and do Find It until your dog can relax and begin again. You might just have to stop for that day and try again at a better distance, in a better location.
Film your set-up so that you can watch what happened. If possible, have your camera person occasionally show the trigger in the camera, so you know where the trigger was when you watch it again. But mostly they should focus on you and your dog.
Watch the first 30 seconds after the dog gets out of the car at the set-up location. Note whether you got the leash ready BEFORE you let your dog out. Assess your dog’s body language.
Watch your video and try to pick out where you and your dog did the best job (it could be different spots). Note your dog’s body language and anything that could be improved.
Did you start below threshold (green or blue) or was the dog sucked in the whole time (yellow or worse)?
Did you accidentally lead your dog toward the trigger after he was already aware of it, even subtly?
How were your leash skills? Bows, braking distance, leash off the ground, etc.
We will discuss troubleshooting some more in the next lesson, but the BAT Troubleshooting PDF will help give you a head start.
Cut to a short clip to share to your peers to discuss in the ABBA Facebook group.
BAT Set-Ups (why, what helpers do, safety, picking the right space)
Do a BAT Set-Up
TIME TO REHEARSE
In the last lesson, you practiced your survival skills, so now hopefully the reactions on walks have decreased in frequency and intensity. Keep thinking about how you can help your dog avoid over threshold moments on walks and in your everyday life. In the meantime, let’s get started with the BAT set-ups, where your dog can really practice being boring around his trigger.
Note that I wrote “bor-ing,” not “bor-ed.” The dog himself should be having a fairly good time, in a relaxed way. But to anyone watching you train, your dog is just going to be walking around sniffing things. Boring.
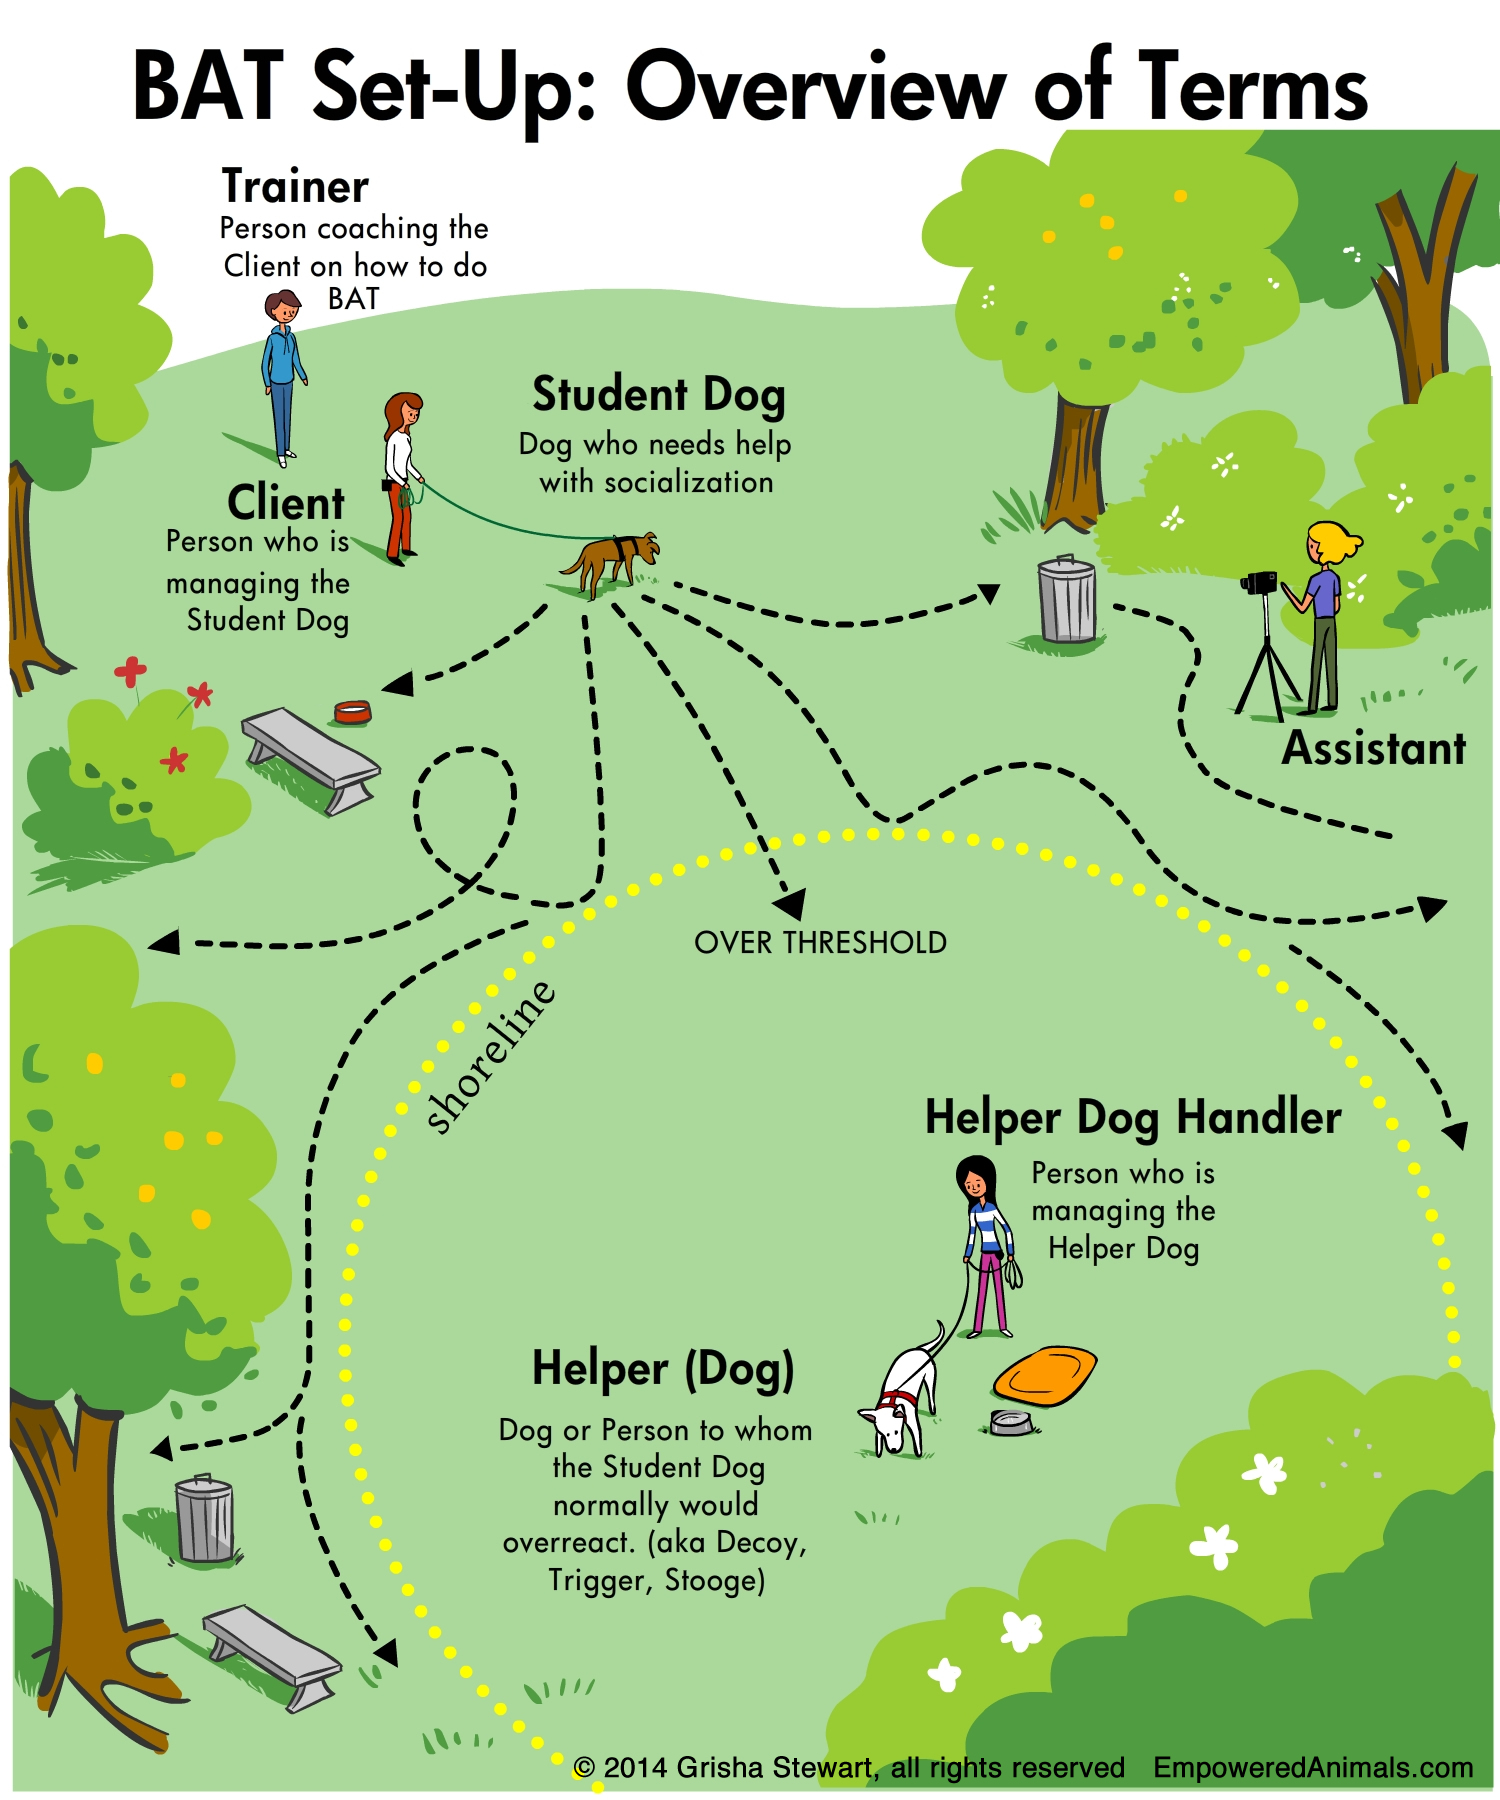
WHAT DO BAT SET-UPS LOOK LIKE?
As I mentioned before, BAT set-ups are rehearsals for relaxed behavior.
Using the ocean analogy from Lesson 2, our dog can wander around the “beach” (no big interest in the helper), even occasionally approach the “shoreline” (show interest in the helper), but you will not let him step into the “water” (stressed, too focused on the helper). We want the dog to be curious about the helper, but not showing signs of fear, frustration, or aggression.
Click to Enlarge
Please do not share the above image or post online 🙂
Now that you know the leash skills and you understand the ocean analogy for body language, set-ups are only a matter of putting that information together.
BEFORE YOUR SET-UP:
Practice leash skills until you feel comfortable doing them anywhere.
Practice Mark & Move and other survival skills. Make sure to include just using “Done?” as a marker (question to the dog) and praise after moving away. No tugging on that leash as you leave!
Pick an area that is interesting to your dog. Bushes, trees, smells, hills, etc. No scary sounds or other triggers. Your dog will probably give more relaxed, exploratory behavior at the edges of such an area, rather than in the center of a field. As your dog gets more advanced and you can work up close, an area with a chain-link fence would be useful, so you can work with that between the dog and the helper.
Have a friend meet you there to be the helper (with a dog if that’s your dog’s issue). Your dog shouldn’t come into contact with the helper until you are ready – meaning your dog has had a chance to explore the space and calm down first.
2-way radios or mobile phones are useful for staying in touch without needing to shout. If you use a phone, call at the beginning and lease the connection open.
(optional) Exercise your dog a bit before by going on a walk in a place where triggers are unlikely, searching your back yard for treats, etc. Fetch isn’t the best option because it is such an exciting activity and that can contribute to trigger stacking during your session.
Bring a stuffed food puzzle.
Bring fight break-up equipment. I have never needed it during a set-up but I bring Spray Shield every time, just in case.
SETTING UP:
Once you get to the space where you will do your set-up, take a look around and make sure it’s still a good place for your dog to work.
Calmly attach the harness and long leash before going outside (i.e., inside the car or your house). Double-check that the dog will not slip out of the harness and that you are in basic position (so no leash on the ground) before the dog gets out of the safe place.
Toss some treats on the ground before your dog gets out of the car. (This can be done in advance or you can also use Sprinkles, just not every time).
Let your dog out of the car to find the treats and then explore the area for about 5-10 minutes. This includes the tripod (if you have one) or camera person.
Walk away or distract your dog for a bit and get the helper into position. This should be so far that your dog would not go running over there or try to avoid the helper, but just notice and move on with exploring.
The helper can act normally (dog sniffing for treats, human relaxed and interacting with the student dog handler) if the student dog can handle that. If not, move farther away or have the helper be more stationary, turned away, etc.
If your dog is very focused on the helper, you are too close. Encourage movement away, do find it, turn the helper away, etc. and set up again at a better distance.
DOING BAT
Here is a video of Jennie Murphy, CBATI doing a BAT set-up in Newfoundland, Canada. Listen to the instructions that Jennie gives to her client as well.
BAT steps:
Let your dog explore the area (including the trigger) on a loose leash. Stay out of the way!
Slow stop if your dog walks directly at the trigger (or otherwise seems too focused)
Go back to step one – walking any direction except for right at the trigger is okay.
Over time, your dog will probably wander closer and closer to the trigger, but never in a straight line. In this week’s set-up, don’t go close enough for your dog to reach the helper, even if you think he’s ready. I want you to know what to do and be absolutely sure that it will go well before we take that step.
In the chart below, doing BAT right is the green loop or the blue one. The colors match the ocean chart from the body language lecture. If you are too close, you end up crossing the shoreline into the water, and we have the yellow or orange from this chart.
Click to Enlarge
The yellow zone here is when your dog takes a while to disengage, but is still sniffing, mouth open, the heart rate isn’t particularly high, and you start to see little signs of disengagement, like ears relaxing or twitching. In that case, WAIT for disengagement, and then prompt a move away. So the only difference between this and the ‘correct’ version of BAT is that you don’t just follow the dog after. We assume that if it took so long, the dog is slightly magnetized and may not make ideal choices on his own. We suggest the move away after disengagement in the yellow zone because it may not occur to the dog. This is an example of Mark and Move because we say “Done?” or “Yes” when the dog disengages, move away, and praise.
The ‘darker’ yellow and orange parts on the chart are when we have really gone too close and don’t think the dog will disengage on his own. The dog needs help anywhere from a shift of your weight to a full recall cue. For example, if slow stop was too difficult or the dog is getting taller, etc. you’d call the dog away. Mark and Move and other survival skills are handy here.
Let’s recap:
Manage the activity and distance of the helper to keep your dog’s stress level low. If you do that well, he will keep himself out of the “water.” You can just stay out of his way. This empowered exposure lets him learn that the helper is not a threat (even possibly fun) and that he can explore and move away. If your dog is used to interacting and needs a verbal connection to normalize the situation and keep his stress level low, calmly talk or pet him for a bit when he checks in.
If you see your dog walk directly toward the helper at any point, think of that as reaching the shoreline. Slow your dog to a stop at the shoreline, giving him a chance to calm down, gather information, and decide what he wants to do next. After your dog comes to a full stop, relax the leash so that the leash makes a U-shape or “smile” between you and your dog. This allows him to decide what to do next without added tension from your leash.
When your dog is done looking at the helper, he will disengage, meaning that he turns away, stops focusing on the helper, etc. The most obvious behavior here is a head turn and a shift of his weight. Praise (optional) and follow him on a loose leash in whatever direction he goes, except for directly at the helper. If your dog immediately starts to go directly toward the helper again, he is too focused and needs his lifeguard, so call him back and try again from farther away.
AFTER THE SET-UP
Knowing when to stop can be tricky, because humans are generally ‘greedy’ and want to keep training. 🙂
Keep an eye on your dog’s interest in the activity. Try to avoid ‘training to the point of failure’ but if your dog wanders away, shows signs of stress, etc. then stop the session or take a break. Toward the end of your set-ups, while things are still going well, you can move to an even greater distance so things are very, very easy for your dog. Following the helper from far away is a great way to finish up a session. A walk ‘together’ — at the right distance — can be pleasant and social, a chance to continue to learn in a relaxing way.
You could also do something like a casual Find It or feed your stuffed food puzzle to your dog in that location or in the car. The idea here is just to have a relaxed and pleasant way to finish up the session that doesn’t take away from the lessons your dog has just learned.
So basically you have a sort of BAT menu:
Appetizer: Find It
Main: BAT set-up (follow your dog around)
Dessert: Fun activity with the helper, Stuffed puzzle, or more Find It
Download the BAT Basics PDF handout for friends and family from my Handouts Page. It’s available in different languages on that page.
Practice Mark and Move with your dog, with a fake ‘trigger.’ With your dog on leash, put a full treat pouch, toy, or loaf of bread on the ground as the ‘trigger.’ Work at a distance where your dog isn’t completely sucked in and practice still doing the style of following with BAT (i.e., don’t lead your dog toward the trigger once he’s already shown he knows it is there). Vary the behavior, markers, and reinforcers as you practice. Think about which ones to use at the distance you are to the trigger. Film it and when you watch your video, note which Behavior, Marker, and Reinforcer you used for the Mark and Move parts.
Body language. Re-watch your Mark and Move session or use another video of your dog (ideal: video of your dog doing some other kind of training, like classical counterconditioning, clicker training tricks, etc.). For 30-60 seconds of of the video, really dig into what body language you are seeing. I recommend you take the time to write it down.Example: “From 1:00 – 1:12, Fiona’s ears were perked forward, eyes on the trigger, and her body was mostly still with a low tail. At 1:13, she exhaled heavily, turned her head away and focused on the treats in her handler’s hand. From 1:17 – 1:45, she took treats rapidly from the handler, but her jaws were using a pretty snappy motion and her gaze darted back and forth between the trigger and her handler. When the handler turned his body away from the trigger and began to walk, Fiona followed and at 1:55 she did a shake-off, after which her tail relaxed, her movements became more relaxed, her mouth opened and her breathing was more regular.” It can be more specific if you play it back in slow motion.
Practice Touch.
Have a friend that your dog likes be your ‘trigger.’ Practice survival skills, like having your trigger come around corners, move toward you, etc.
Let’s take a look at some more options for you to use to help your dog relax.
You can’t control triggers on walks, but you can control where you go and what you do to keep your dog “on the beach.” If you see the trigger before your dog does, proactively arrange your distance to the trigger so that your dog will stay relaxed when he sees it. Cross the street or move behind a car or trees until the trigger passes. That way, when your dog notices the trigger, he can make his own choices without needing your help.
Take walks in places without off-leash dogs, change your walking time, etc. If your dog is “in over his head” (or soon will be), call or Mark & Move without shouting or tugging on the leash.
Sometimes you can’t move far enough away. In that case, you are in survival mode and have to distract your dog from the trigger. This can happen a lot during urban training. In the ocean beach analogy, if you can’t bring your dog back to shore right away, you need to toss out a flotation device. There are many standard trainer tricks to get through this sort of situation.
Room to Move
Trapped!
Mark & Move
Touch (nose to hand) as you walk away
Find It (toss treats on the ground) as you move away
Toss treats at a loose dog and move away (keep your dog’s focus if you do that)
Click for looking at the trigger, then treat
Tricks (Touch, chin targeting, etc.)
Find It in place (don’t do this with loose dogs!)
Stand between your dog and the trigger and cue Watch Me
Constantly feed your dog until the trigger goes away
When you use distraction to get through this kind of situation, stress may still build up. Distraction doesn’t necessarily give your dog any active coping skills or teach the dog that the situation is safe. However, it’s not nearly as bad as having your dog freak out. If distracting doesn’t work, do whatever you can to hold on and keep everyone safe. Do not make things worse by trying to punish your dog. Assess your dog’s stress level. You may need to do Find It to help your dog relax (toss treats to find on the ground) or head home.
When you get home, brainstorm to avoid getting trapped again in the future. For example, do you have to walk that particular route? Can you drive somewhere else to walk?
Note: It’s tempting to stay in the city and be continuously in survival mode. If you want to stop micromanaging your dog, set up scenarios where your dog can be relaxed, even if it means driving to a location being creative about locations, implementing visual barriers, trying medications, relaxation techniques, etc.
Think of it this way. Imagine you are an elementary school teacher. What is the better way to teach?
Give a child a realistic, slightly challenging math problem he is able to think through and solve on his own, or
Give him a calculus problem and tell him what to write on his paper to get to the answer?
While option 2 is better than, say, giving him a calculus problem and then hitting him when he gets the wrong answer, it’s still better to give the child a question that is interesting but possible to solve on his own. When you need to help your dog, be proactive, making it so that he still has a chance to practice decision-making but is likely to make the ‘right’ choices. Set him up for success and let him think!
Keep working at ways to set your dog up to stay calm during walks, so the training you will do in the BAT set-ups can take effect. When you start doing set-ups that allow your dog to experience the trigger in a stress-free way, you will see dramatic improvement.
So far, you have practiced the leash skills that will help you and your dog relax during BAT set-ups. Please also practice those skills on walks any time that it is safe. If you don’t feel ready to use the longer leash on walks, that’s fine; just keep practicing in areas without your dog’s triggers. I want you and your dog to be safe and confident.
This lesson is about survival skills, including Mark and Move. We also recommend that you use the body language information from last week to assess your own dog’s body language.
Most of the progress your dog makes will come from set-ups. The survival skills discussed in this lesson are aimed at reducing stress on walks and in real life, so that your BAT set-ups can do their magic. Survival skills also increase safety and make it so that you can be more relaxed and less embarrassed on walks!
MARK AND MOVE vs. BAT
Mark and Move is a variation of BAT to use when you can’t do ‘proper’ BAT set-ups. I thought long and hard about whether to present the information on BAT set-ups first or the survival skills first in this course. Having this first will help make your walks more safe and comfortable right away. The reason I hesitated to start with this is that I was afraid that you’d think that this is what BAT is all about, marking and moving. But BAT is about a partnership with your dog, a flow, working at a distance that gives your dog a chance move around the trigger (mostly) without your intrusion.
When your dog is close to the trigger, you have to help out, with cues, clicking, treats, etc. so that your dog can function at that distance. That’s survival, not the ideal place to learn to be relaxed around the trigger. At the right distance, you won’t need to micromanage; you can let your dog have more control with fewer distractions from you. BAT set-ups will be discussed next week. Just remember that Mark & Move and other survival skills are for when the ideal situation isn’t possible.
WHAT IS A MARKER?
We aren’t talking about the tools that you write with on posters. A marker is something like a clicker, word, or hand movement that tells your dog that he has done something to earn a reinforcer. Markers pinpoint the behavior, like a camera taking a picture. Using a marker is an efficient way to teach your dog to repeat behavior that you like.
For example, you could teach Touch, which is an extremely useful survival skill:
Hold out your ‘target’ hand in an unusual way (ex. fist, pointer finger out, etc.)
Dog sniffs your hand
Click (and put your target hand behind your back)
Reinforce (feed a treat, throw a toy, etc.)
When your dog is reliably touching your target hand whenever you hold it out, move to new places, have your hand further away so the dog has to reach more for it, etc. When that is going well, add a verbal cue, like Touch. Say “Touch” just before you put your hand out. If you want to get fancy and make sure the dog only touches when you ask for it, then start to only click/treat if you have said the cue. One time out of 5, don’t say Touch, and then don’t click/treat. If your dog hesitates, praise him and reinforce the hesitation by saying another cue, like Sit, and reinforcing that.
MARK & MOVE
When your dog sees a trigger on a walk, he may be able to handle the whole situation on his own or he may need a little help. It’s tempting to head the other way whenever you see a trigger, but try to allow your dog to do as much as she can on her own.
NOTE: There’s one big issue that’s worth pointing out. With BAT, we should not get stuck in a rut of forward-back-forward-back. Follow the dog instead of having your own agenda. Convincing the dog to go toward the trigger is not recommended in BAT 2.0, even with Mark and Move. Even walking toward the trigger before the dog walks that way is generally to be avoided. This is especially important to watch for with Mark and Move, where you tend to have treats on you, which can lure the dog foward.
1. Behavior
When your dog notices a trigger, assess which of these your dog can do on their own without freaking out (that’s the technical term for ‘can do while the heart rate is steady or slowing down to normal’):
Body turn away from trigger
Head turn
Look away
Blink, ear twitch, etc.
Look at trigger is enough!
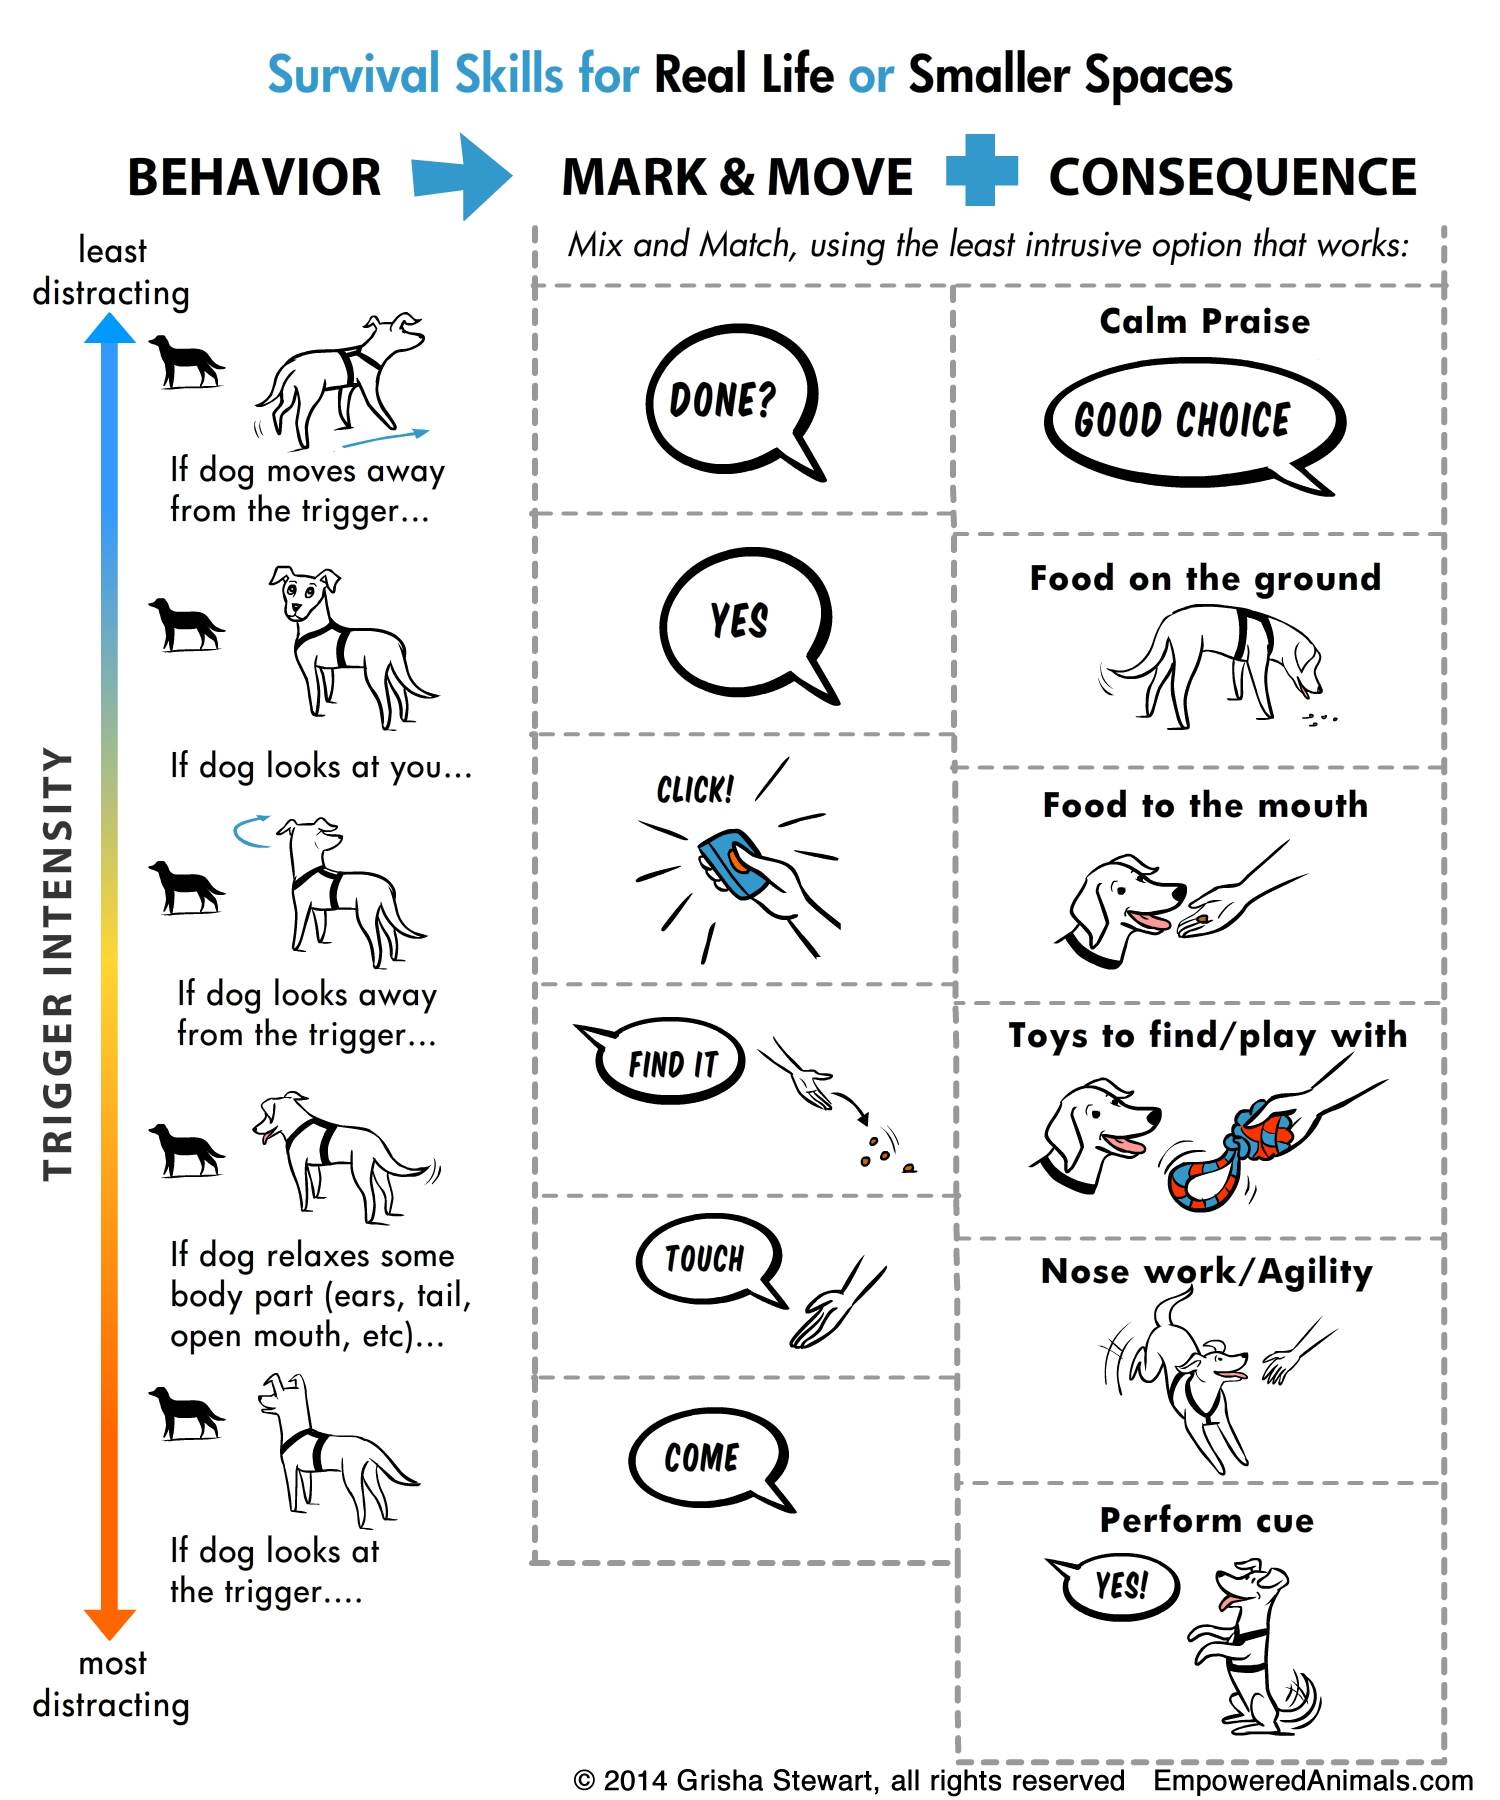
As your dog does these behaviors, <strong”>mark and move away from the trigger, and then reinforce with something (I’ll talk more about how to select your reinforcer later). The least intrusive thing to do is to let your dog process the trigger on her own, so waiting until she turns her body away is great. But she may not be able to do that with this trigger, at this distance. If you think there’s even a 1% chance she will start getting more excited instead of being able to turn away, mark something smaller. The list above is rated from most to least responsibility for the dog (also most to least empowering). When in doubt, pick something lower on the list, but just know that the goal is for the dog to do this all on her own, so go higher on the list if she’s ready.
2. Mark
The marker you use is also important. You can just pick the same one every time. If you are more advanced, use the same rule as above and pick the least intrusive marker.
Examples (in order from least to most intrusive/distracting):
“Done?”
“Yes”
Clicker (or hand flash for deaf dogs)
Cue (Touch, Come, etc.)
Any of these markers work well in the moment, but a cue or a clicker grab the dog’s attention in a big way. That’s great when you need it, like when a trigger suddenly comes into view or you have construction workers in front of your home. The clicker simultaneously marks the behavior and brings the dog back to you for the reinforcer. <strong”>But then you still have the dog’s attention for a good while afterwards. You become the center of her universe, so she is missing out on a chance to notice what’s going on in the environment. So use the marker that is just at the right power for the moment. Don’t use a hammer when a flyswatter will do.
3. Move!
After you mark, be sure to move away whenever you can. If you are using these tools, it’s because you are too close to just let your dog wander around and check things out. If you have great treats, your dog will stay wherever you are to eat them, but that doesn’t mean it’s the right thing to do. Staying in one spot puts your dog in conflict. He wants to go, but he wants the treats. Make it easy on him by moving away and then treating. It also has the bonus of teaching your dog to move away fro the trigger in a happy and controlled way (not fleeing, but not charging toward the trigger, either).
4. Reinforce
Moving away was probably already a reinforcer because you’re in survival mode, but adding another “bonus” reinforcer is a nice touch and useful to keep your marker strong. Again, we want to choose a reinforcer that’s not too strong for the situation, drawing all of the dog’s attention to you.
Examples:
Praise
Petting
Food treats
Toys
Activity (jump up, Find It, agility etc.)
Every dog is different, but that list is approximately in order for how distracting it is to your dog. The more distracting it is, the less attention he has for the trigger.
As a general note, it’s better to err on the side of being TOO distracting. Being relatively relaxed around the trigger is the most important thing. If that means your dog doesn’t have a chance to even see the trigger because he’s so distracted, that’s okay. It’s better than freaking out and barking, because that will have a negative effect on the rest of your dog’s experiences that day. That said, if you are confident that your dog is capable of looking at the trigger and turning away on his own, then he can learn more from that encounter.
Note: Mark and Move can be used whenever you need it. That includes walks and in set-ups where you can’t move far enough away. If you are familiar with the older version of BAT, Mark & Move is similar to the “Stages.” Just make sure that you still let the dog be in charge of moving forward, with you as the brakes to keep him from getting too close.
Don’t get in the habit of doing BAT the old way, by moving away and then suggesting the dog forward again. Wait for your dog to be the one to initiate movement toward the trigger and try to have movement be in a natural set of curves, not a straight line at the trigger. And whenever you can, use the regular set-ups, discussed in the next lesson, rather than Mark & Move. It’s a survival skill, with less learning for the dog, but more control for the person.
Click to Enlarge
Please do not share this image or post online 🙂 It is available in the Ahimsa Manual.
Take the time to write up an assessment of your video (for yourself or to discuss with your fellow students in the group)
“Assess This Video” (explained below)
Continue having 3 treat parties per day (at least 3 weeks total)
Practice Find It
Optional: purchase a basket muzzle if you plan on doing up-close work at some point and your dog has bitten, air-snapped, or otherwise has warned you that she may bite.
MORE LEASH SKILLS PRACTICE – WITH YOUR DOG
Work in a safe area with the leash on the back of the harness. Practice with your regular leash on walks whenever it makes sense to do so.
Using a short leash (6 feet / 2 meters):
Handle
Slide
Slow Stop
Relax the Leash
Mime Pulling – Your dog isn’t the student here, you are. When you practice mime pulling, give your dog some ‘hazard pay’ by pointing out some interesting spot to smell or tossing the treat on the floor ahead of you when he moves away with you. This also has the side benefit of making him more responsive to mime pulling.
Using a long line (12-15 feet / 4-5 meters). Move away from your dog and walk back as you shorten and length. Also set up situations where your dog will move away and toward you, at various speeds.
Shorter
Longer
Put it all together to practice each of these skills with a long line as your dog does “Sprinkles.” Try to follow your dog and stay out of the way. Only use the ‘control’ skills when needed (Slide, Slow Stop, Mime Pulling).
Handle
Slide (use only when you need to get the dog’s attention)
Slow Stop (use only if the dog is headed somewhere where he should not yet go)
Relax the Leash
Mime Pulling (use only when you need to get the dog to come away immediately and calling hasn’t worked)
Shorter
Longer
Here’s a tip to get good video to watch later, it to a short clip to share for to your peers to discuss in the ABBA Facebook group. Work in a small enough area with your tripod in the corner, so that your dog will not stray too far from the camera. You can also set up some stations with smells (treats under cones, etc.) so your dog will move in more predictable ways.
ASSESS THIS VIDEO
Watch this video again and note (for yourself) the times that each of the BAT Leash Skills listed above are used. For the control skills in particular, why do you think they were used at each point?
For example, you can’t see it with the camera angle, but at 0:10, we used mime pulling and verbally called Archie to move him away from the trigger. He had clearly gone over threshold. Later there’s an exception to the rule of not doing a Slow Stop when the dog is moving away from the trigger. You should wonder why that was done, because it’s not for the dog – in this case, it was because he was headed toward an off-limits area (students were testing and could not be disturbed).[/s2If]
This is really useful as a distraction for times when the trigger is too close to your dog in real life. The goal is to be able to say Find It and have your dog’s nose drop immediately to the floor to search for treats. To train Find It, have a treat that your dog loves in your hand. Say Find It a second before you toss the treat on the ground near your dog. At first, your dog should see you tossing the treat, but after several times, start to have her use her nose to find it. For example, you can drop the treat behind your back and then say Find It.
You can hide the treats a few feet away as you distract her with your other hand. You can drop treats one onto the sidewalk as your dog walks ahead of you, then stop and say Find It. Get creative. If your dog doesn’t find it right away, that’s fine, as long as she is searching for it. If she stops searching, it was too challenging, so make it easier next time.
If your dog is not really excited about food, get better treats, go to an area where she is less stressed, or try Find It with a toy instead.
[vc_video link=”https://vimeo.com/135901151″]
EQUIPMENT FOR WORKING WITH REACTIVITY
We already discussed some of these in the last lesson, but here’s the full list:
Harness. Have a front attachment if you need more help controlling your dog around triggers on walks. Attach to the rear for BAT set-ups if you feel safe doing so. Make sure the harness fits your dog well.
12-15 foot leash (4-5 meters) for set-ups.
6-15 foot leash for walks. Wait use the longer leash until you become comfortable using it safely, even if your dog were to jump at something. Shorten the leash up at corners and have your dog wait as you check to see what’s around it. Never allow your dog to go around a corner without you.
Treats. Especially useful for walks, or for making the training area more interesting.
Treat pouch. Don’t always have your treats in a pouch, and don’t always have the treats on your body. But treats are a great way to reinforce coming back to you and a pouch is pretty convenient for walks. What else can you use as a reinforcer?
Muzzle. A basket muzzle is ideal, like the Baskerville Ultra or the Italian Basket Muzzle. Used for close-up work when no fence is available to put between your dog and the trigger.
Fight break-up tools (will hopefully never be necessary). Like Spray Shield, blankets, water bottle, fog horn, etc.
[vc_video link=”https://vimeo.com/135899304″]
What’s not on my equipment list:
Please replace any gear that is uncomfortable or meant to correct / punish your dog’s behavior. BAT gives dogs confidence and allows them to practice good social skills. It works by reducing stress and teaching the dog that he can control his own comfort level by moving his own body. You may not feel ready to promise to go without your favorite tools forever, but you wouldn’t be here if what you had tried so far was perfect. To give BAT a full chance to work, please go without these tools for at least the 6 weeks of this course:
head collars*
prong collars
check chains
collars (don’t attach the leash there, but of course you can use them for ID tags)
e-collars
spray bottles
pssst sounds, loud, gruff voices, etc.
* If you feel you really must have a head collar for walks, please get a double-ended leash and clip one end to the front of a harness and the other to the head collar. Use the harness for most communication with the leash and the head collar only as an emergency back-up.[/s2If]
Body Language: when to stay out of the way and when to jump in to help
Find It
Equipment for working with reactivity
More leash skills practice – with your dog
Assess video posted online
BODY LANGUAGE
When you do BAT, it’s important to be able to understand and predict as much of your dog’s behavior as you can. This is actually true even if you aren’t doing BAT, too, so a nice benefit of doing BAT is that you will be able to learn more about what your dog is doing. When you can’t predict your dog might do next and you have no control over the situation, it’s scary and when it’s scary, people tend to use techniques that aren’t necessary.
For example, let’s say that your dog barks and jumps out at a child as you walk by. You might be embarrassed or scared. Because of previous training, self-preservation, or something you saw on TV, you might give the leash a quick pop or even lift the dog in the air. You might pin him to the ground in an attempt to teach him not to do that next time.
Unfortunately, that type of training can backfire and the dog can get much worse instead of better, like turning to bite you when he feels pressure on the leash. It might just teach your dog to ‘lie’ to you by eliminating the warning signs (like growling), so he holds it all in and then bites out of the blue one day. Even when it ‘works’ you might be creating an adversarial relationship when what you really got a dog for is companionship.
On the other hand, you might be savvy enough to know that you can prevent a reaction by talking to your dog or giving him a treat whenever he sees children, so that he starts to look at you instead of worrying about the child. That’s certainly an option and something you’ll keep in your toolbox. It won’t be something you need during your BAT set-ups, but it may still come in handy on walks.
The good news is that whether you have tried the first techniques described or the second one, the observational skills you used so far will come in handy.
BAT gives dogs more responsibility for their own actions, with natural consequences, so that we don’t have to micromanage all of the time. What we do need to do is read our dogs’ subtle body cues to know when they need to be left alone to learn and when they need to be helped. BAT gives dogs a safety net without taking away their opportunity to learn naturally.
In more old-fashioned training, the handler is looking for the moment that the dog does the ‘wrong’ behavior in order to punish the behavior. So when you see your dog close his mouth, start to bark, or even look at the other dog, that might be the time you would have given a correction. It is still important to recognize such moments, but we will interpret them differently.
In BAT, you’ll carefully arrange your training sessions so there is no lunging, barking, etc., but sometimes it happens. If you do see something going ‘wrong,’ it’s not that the dog has made a mistake, it is that the set-up is too difficult for him. Your role is totally different than it was before, but your quick response is just as important now. Think of yourself as the lifeguard and you see your swimmer start to flail and drown. You won’t wait for their head to go under and then yell at them.
At the earliest moment that you see that the dog is no longer able to handle the situation on his own, encourage your dog away from the trigger and back to a place where he’s able to stay relaxed without your help. One of the skills that you will take with you into a BAT set-up is the patience to not interrupt the dog when he’s doing well. If you arrange the situation carefully in advance, you will get a lot of opportunity to let the dog figure things out on his own.
On the other hand, if you are used to feeding your dog just after he sees a trigger, then you have been looking for the moment of connection with the trigger. It’s good that you can recognize that moment and see it as a positive thing. With BAT, you’ll now be working without the food, most of the time, so you will probably need to be much further away.
We want the dog to be able to notice that the trigger is there and move on without your help. You’ll have to contain yourself and not always interrupt the moment that your dog sees the trigger. If he’s relaxed (tail neutral, breathing normal, muscles soft, body at an angle instead of pointed right at the trigger) then just take it in and move on. This is where some of the desensitization happens, meaning that your dog has a chance to take in information and move on at his own pace. One of the skills that you take with you into BAT is the knowledge that we have to set the dog up to succeed.
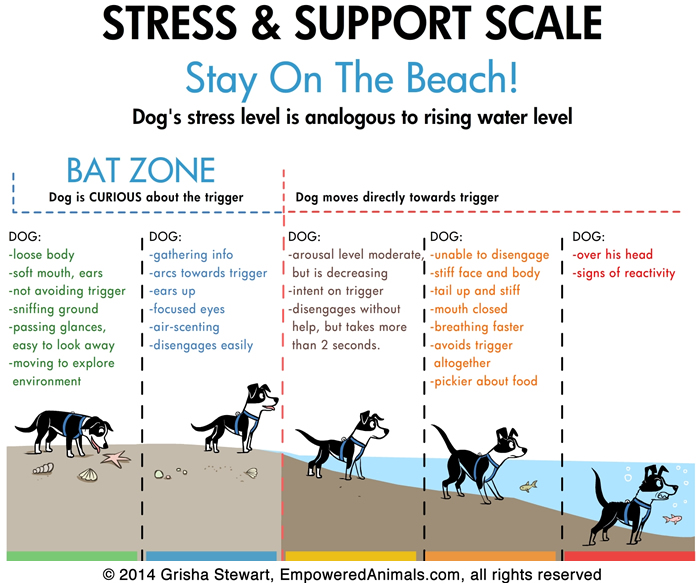
In the illustration below, the water represents the stress level and the dog’s ability to relax himself. As she goes deeper into the ‘water’ your dog will need more help. When she is on the shore, she needs the space to learn without micromanagement. We want the dog to stay in the Green and Blue areas at all times. I’ll give you tips on what you can do in each of the colored areas, but read through this chart just to get a feel for how the body language changes as the dog gets more and more excited/stressed by the trigger.
Click image to enlarge
In this picture, the shoreline is what I’ll refer to as the threshold. Your dog is over threshold if he needs some help from you in order to move on. We will say he is below threshold if he is doing the behaviors in the green area (dog is not avoiding trigger, he knows where the trigger is but is not bothered to give it more than passing glances) or the blue area (dog cares and may need to get some information but he is able to easily move on).
Think about situations in the past where your dog has been in each of those colored areas. Don’t worry too much about splitting up yellow, orange, and red, unless you are a trainer. The important part is the line between whether you have to do something or the dog can handle things on his own.
Watch these two videos. At one point in the first video, the dog enters the ‘blue zone.’ Look for it! In the second video, There is a spot where the dog is near the yellow zone, but I still consider it blue zone because the dog is able to turn away on his own in a reasonable time, without prompting.
[vc_video link=”https://vimeo.com/135901022″]
[vc_video link=”https://vimeo.com/135894169″]
Combine your understanding of the ocean chart with Leash Skills:
The leash walking skills that we have practiced are designed to help us stay in the green and blue zones. They can also be signs that your dog is having trouble during your set-up. If your dog doesn’t easily respond to the Slow Stop during a set-up, for example, then you are working too close to the trigger.
This week, practice doing the leash skills in an area where it is easy for you and your dog. If they aren’t working, you are either not doing them correctly (for example, you are pulling on the dog instead of doing pretend pulling with the mime pulling), the area is not interesting enough for your dog to explore with his nose, or the area may have too many triggers.
For each ‘week’ of lessons, we put in this Pause to Practice so that you won’t just read through without practicing. Feel free to pause to practice anywhere along the way, too!
Again, we don’t expect it to just take one week for many people. Take your time to get it right. The leash skills are the key to doing BAT well.
Sit down and write out your goals for your dog. Are they realistic? What measurable goal do you think can you achieve in the next month?
Film yourself doing leash handling with a human. Watch your video and look critically at each skill. Are you holding the Handle the same way? Is it a tight bracelet? Do you have enough braking distance? Are you gathering in figure 8’s or accidentally gathering in loops?
Do a “Sprinkles” exercise with your dog, as described by Sally Hopkins. Practice quiet off leash near your dog.
Repeat the above exercise, on leash, using the BAT handling skills that promote freedom (handle, braking distance, shorter,longer). Only use the control skills if needed (Slow Stop, Slide Mime Pulling).
Written assessment: Type out some comments below your video to point out any places where you did especially well or could have done better. Include specific times, like 0:22 – 0:33. One of the things I want to teach you in this course is to look at your own videos objectively and look for places you can continually improve. Please ignore the size of your own backside. 🙂 This is just for you, mostly.
Optional: Cut to a short clip to share for to your peers to discuss in the ABBA Facebook group.
Practice 3 treat parties a day.
Play this game with a friend. Face each other with a leash draped in the palm of your left hands, so that both of you have the same amount of extra leash hanging down. Both do Slide at the same time (so you’ll reach with your right hands first, under the leash). Both of you do Slide 10 times (5 times per hand) and then notice who has more leash at this point. The person with the least leash is the ‘winner,’ because Slide is not about pulling the leash, just gently letting it slide through your hands. [This is more fair if the leash has clips on both ends or is just a rope, so the clip doesn’t weigh things down.]
At least three times a day, take a full 30 seconds to reward your dog for coming to you. Start in a quiet place where you have no treats on you, but they are available (in a cupboard, etc.). Out of the blue, say “Treat Party” and then run to the cupboard, and start the party. Some of the time the treats can be on you, but make sure that treats aren’t always there before the party begins. Otherwise, the treats become the cue, not the Treat Party phrase that you are trying to teach.
Continue rehearsing treat party at least a few times a day for at least a few months. As you feed or play with toys, say the cue/phrase over and over, like Treat Party, the whole time I’m tossing out treats on the floor. Be sure to cue Treat Party before she knows that you have treats, so the phrase predicts the party. Treat Party is an emergency cue for coming back to you.
Say the Treat Party cue only when your dog is definitely coming to you, and then repeat the cue during before each treat during the feeding (or playing) process. I use the goofy cue of Treat Party because I want you to keep the parties coming, so that that cue stays strong, even if all else fails. Make sure you also remember to say the emergency cue in a real emergency. Practice in many different locations, but be sure it’s the right level of distraction. Set it up so that your dog will definitely come to you when you say Treat Party.
VIDEO NOTE:
I really like video because it gives me a chance to see where I can improve. Expect to see videos in this course where I follow up with an explanation of how I could have done better. You can post your videos for peer discussion in the ABBA Facebook group. If you do so, please be (emotionally) ready for suggestions from your fellow students and any CBATIs in the group on how you can improve.
Catch yourself doing things right in the videos, but it will probably not be perfect. If you do post video to the group, point out what went well and also be sure to note times when you could have done better, and explain how. This is a good opportunity for you to learn.
For example, in my leash video above, the dog is wearing a flat collar because we had no other gear. I would really, really prefer to have her in a harness. I use the rear clip for BAT set-ups, unless more control is needed for safety.
The leash skills are extremely essential in BAT, because they give a sense of freedom while still being safe. Be sure to get these down before you do your BAT set-ups. They are harder than they look and they take time to practice, so be patient with yourself.
Practice having a quiet body. The first leash skill isn’t really about the leash, it’s about you. Follow the dog whenever you can (when it’s safe). This doesn’t mean standing behind her all the time, but it means watching how your body might accidentally encourage her to go in a particular direction. You can even practice this off leash in your yard with treats scattered around or on a walk in the woods. Stay near her, but out of the way while she sniffs. (Only do that if it’s safe!)
Here’s a video of me doing some leash skills with Peanut. There is no planned trigger here, I’m just doing them to get them on film, like you will do for your homework. Notice that the goal is for me to stay out of his way.
[vc_video link=”https://vimeo.com/131015410″]
Now here’s a video demonstrating some of the other leash skills used for control (Slow Stop, Slide, Mime Pulling). Notice that I have the very opposite of a quiet body here – I’m very obviously leading her around a BUNCH. This is just for a demo. You do not need to do this much controlling in a good BAT set-up (and if you do, then stop the session and change something, either the environment or your own level of bossiness).
[vc_video link=”https://vimeo.com/135900521″]
Here’s me describing the leash skills in another way:
[vc_video link=”https://vimeo.com/135890737″]
Please download the leash skills handout PDF from the public Handouts Page. Practice each of these skills. Watch the video above before you try them out with a friend. Here are a few illustrations to help you.
Slow stop is used any time you need to stop the dog without the added distraction of calling verbally.
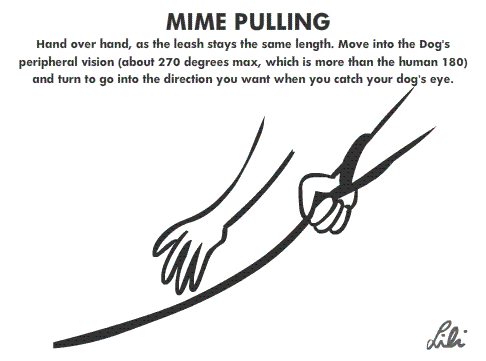
Mime pulling is used to get the dog to turn and go with you, when calling away isn’t enough. The illustration below shows the “Slide” aspect of mime pulling. Your front hand doesn’t grip the leash, it just slides through to create a vibration. Your hand can even be flat. Use slightly more braking distance than this illustration.
PRACTICE
Using a friend as your ‘dog,’ practice the following skills. I know you are eager to jump ahead, but please practice this for a while without your dog. During the exercises, the human-dog should walk upright (as humans do) and hold the leash clip at his/her waist (target the belly button).
The person should give you feedback on how it feels. If you don’t have a human to practice with, tie your leash to a chair. For Slide, slow stop, and mime pulling, swap roles with your friend so you can see what it feels like.
Using a short leash (6 feet / 2 meters), practice:
Handle
Slide
Slow Stop
Relax the Leash
Mime Pulling
Using a long line (12-15 feet / 4-5 meters), practice by having yourself move away and toward the ‘dog’ and also having your human ‘dog’ move away and toward you, at various speeds:
Shorter
Longer
Put it all together to practice each of these skills with a long line, and post clips from this part (try to show each skill, no more than 2 minutes total).
We have the lessons clustered into weeks, but don’t be put off by that if you need to take more time. It’s very common to spend 2-3 weeks on each “week” of lessons from here.
Week 1: BAT Overview
What is BAT?
Leash Skills: Staying out of the dog’s path, Handle, Slide, Slow Stop, Relax the Leash, Mime Pulling, Shorter, Longer
Practice leash skills with people (Gold level: submit video & written assessment)
Training: Treat Parties (not officially BAT but very useful)
WHAT IS BAT?
The answer to that question depends on who you are and how much you know about dogs. This course is intended for all audiences, so I’ll give a general answer first.
BAT helps dogs practice social skills in a way that improves confidence and self control. Your dog has a chance to practice being relaxed and ‘normal’ around other dogs, people, etc. We are used to constantly cueing and helping our dogs in order to keep them within the range of socially acceptable behavior. Wouldn’t it be so much better if they just did it on their own, naturally?
BAT stands for Behavior Adjustment Training because we focus on adjusting the behavior within the natural set of consequences. BAT could stand for Boring Aggression Training. The goal is to have a dog whose response to people or other dogs is boring: no barking, lunging, growling, etc., and no need for you to micromanage to make that happen. The dog has a chance to practice controlling his own safety and stress level, with us providing a safety net. With BAT, we rehearse being boring (but not bor-ed), over and over!
There may never be a BAT television show. BAT’s boring to do and even more boring to watch. If you do it right, there are no super exciting moments of barking or even frantically feeding or cueing. You just set up situations where your dog can be a dog and learn how to be boring. Let’s take a look at some BAT set-ups in the following videos.
[vc_video link=”https://vimeo.com/135900164″]
And another so you can see a more in-depth session from one dog:
[vc_video link=”https://vimeo.com/135890732″]
BAT has three major components:
Leash Handling Skills
Set-ups
Survival Skills / Mark & Move
Good leash skills allow freedom of movement for the dog (or horse) and they are the foundation of BAT. It is important to know that your movement affects your dog’s movement and mood. If you compete in agility, obedience, or other sports, you know that your dog follows your shoulders, where you look, etc. Most of the BAT set-ups are done on a 12-15 foot leash for safety (4-5 meters). Any small pressure on the leash during your regular walks and training set-ups will also change the dynamic, so I want you to be aware of different ways to move that are less intrusive to your dog’s learning process.
BAT set-ups are rehearsals for relaxed behavior, like I mentioned above, where your dog can practice being boring (i.e., not ‘reactive’). You will use survival skills when you train up close to triggers and in real-life situations that your dog can’t yet handle on his own. (I’ll swap genders around in my lectures, so please don’t be offended if I call your dog a boy when she’s a girl).
Survival skills and BAT set-ups are both essential. We will cover both of them in this course and more deeply cover each of them in other courses. If you only ever do the survival skills, then you have to micromanage your dog forever. You have a ‘trained’ dog instead of one that looks and acts like a well-socialized dog. If you only do the BAT set-ups, then your progress will be slowed down or may never happen because your dog keeps getting traumatized or practicing reactive behavior out in the real world.
The first thing I want to cover is leash skills. We will cover more in-depth survival skills in week 3, but for now, let’s just reduce the barking until you’re ready to do BAT. Carry some amazing meaty/cheesy treats with you on your walks. If your dog sees one of his ‘triggers’ (another dog, person, whatever it is that makes him bark, lunge, pull, act fearful, etc.) call his name just before you feed him some of those treats and walk in the other direction. So for now: call and feed your dog treats just after he sees any trigger on walks.
Read through the lessons at your own pace. Every 2-4 lessons, we will pause to give you some tasks to practice. Each set of lessons with practice is meant to take about a week or so.
If you haven’t already signed up for membership, consider doing so because it is a great way to stay motivated. One thing members get is access to Grisha’s ABBA Facebook group. You can post videos and ask/answer questions in a discussion with your fellow ABBA members. The group is moderated by our teaching staff to keep the conversations on track.
The agenda is listed with weekly lessons, but you can take whatever time you need. Most people actually take about 2 weeks per lesson. You keep access to the course on our site and can log in any time.
Body Language: when to stay out of the way and when to jump in to help
Find It
Equipment for working with reactivity
More Leash skills practice – with your dog
Assess video posted online
Week 3
Mark and Move and other Survival Skills
Practice Survival Skills
Assess body language of your own dog
Recruit help for next week’s BAT set-up
Week 4
BAT Set-Ups (why, what helpers do, safety, picking the right space)
Do a BAT Set-Up
Week 5
Troubleshooting BAT Set-Ups
Do a BAT Set-Up
Week 6
Training up close or in small spaces
Do a BAT Set-Up
Recommended Equipment:
Long leash, 10-15 feet (or two 6-foot leashes clipped together). I recommend (and sell) the round, comfortable Mendota leashes.
Dog harness with rear attachment. I recommend the Perfect Fit, Balance, or XtraDog Harnesses, which have leash rings on both back and front.
A person to help you with BAT leash skills practice (they will walk around being the practice dog at the end of your leash for one session).
A dog with mild to severe reactivity directed at dogs or people (‘triggers’) – from mild fear or frustration through big issues. This course is not appropriate for dogs with generalized anxiety (i.e., anxious and worried about everything, all the time) or only resource guarding (which is dealt with more easily in other ways). This ‘student dog’ can be your own dog or a client’s dog, but you must be ablet to practice with the same dog during the whole course and have permission to film those sessions.
Access to a large enriched/interesting training area in which the student dog is willing to explore and is only mildly interested in the trigger without handler distraction. This may be indoors, but is usually outdoors.
Access to a helper dog or person (trigger), preferably more than one.
For your own assessment, we recommend a Video camera and a way to film yourself training. If you are an ABBA member, you can post videos to Facebook to discuss as a group with occasional instructor feedback.
Collaborative, Empowered Dog Training for Pros and Families – Online!