[s2If current_user_cannot(access_s2member_ccap_course_002_bt)]
To view this lesson, please purchase this course or log in if you have already purchased it.[/s2If]
[s2If current_user_can(access_s2member_ccap_course_002_bt)]
Week 3
- Mark and Move and other Survival Skills
- Practice Survival Skills
- Assess body language of your own dog
- Recruit help for next week’s BAT set-up
THE PLAN
So far, you have practiced the leash skills that will help you and your dog relax during BAT set-ups. Please also practice those skills on walks any time that it is safe. If you don’t feel ready to use the longer leash on walks, that’s fine; just keep practicing in areas without your dog’s triggers. I want you and your dog to be safe and confident.
This lesson is about survival skills, including Mark and Move. We also recommend that you use the body language information from last week to assess your own dog’s body language.
Most of the progress your dog makes will come from set-ups. The survival skills discussed in this lesson are aimed at reducing stress on walks and in real life, so that your BAT set-ups can do their magic. Survival skills also increase safety and make it so that you can be more relaxed and less embarrassed on walks!
MARK AND MOVE vs. BAT
Mark and Move is a variation of BAT to use when you can’t do ‘proper’ BAT set-ups. I thought long and hard about whether to present the information on BAT set-ups first or the survival skills first in this course. Having this first will help make your walks more safe and comfortable right away. The reason I hesitated to start with this is that I was afraid that you’d think that this is what BAT is all about, marking and moving. But BAT is about a partnership with your dog, a flow, working at a distance that gives your dog a chance move around the trigger (mostly) without your intrusion.
When your dog is close to the trigger, you have to help out, with cues, clicking, treats, etc. so that your dog can function at that distance. That’s survival, not the ideal place to learn to be relaxed around the trigger. At the right distance, you won’t need to micromanage; you can let your dog have more control with fewer distractions from you. BAT set-ups will be discussed next week. Just remember that Mark & Move and other survival skills are for when the ideal situation isn’t possible.
WHAT IS A MARKER?
We aren’t talking about the tools that you write with on posters. A marker is something like a clicker, word, or hand movement that tells your dog that he has done something to earn a reinforcer. Markers pinpoint the behavior, like a camera taking a picture. Using a marker is an efficient way to teach your dog to repeat behavior that you like.
For example, you could teach Touch, which is an extremely useful survival skill:
- Hold out your ‘target’ hand in an unusual way (ex. fist, pointer finger out, etc.)
- Dog sniffs your hand
- Click (and put your target hand behind your back)
- Reinforce (feed a treat, throw a toy, etc.)
When your dog is reliably touching your target hand whenever you hold it out, move to new places, have your hand further away so the dog has to reach more for it, etc. When that is going well, add a verbal cue, like Touch. Say “Touch” just before you put your hand out. If you want to get fancy and make sure the dog only touches when you ask for it, then start to only click/treat if you have said the cue. One time out of 5, don’t say Touch, and then don’t click/treat. If your dog hesitates, praise him and reinforce the hesitation by saying another cue, like Sit, and reinforcing that.
MARK & MOVE
When your dog sees a trigger on a walk, he may be able to handle the whole situation on his own or he may need a little help. It’s tempting to head the other way whenever you see a trigger, but try to allow your dog to do as much as she can on her own.
NOTE: There’s one big issue that’s worth pointing out. With BAT, we should not get stuck in a rut of forward-back-forward-back. Follow the dog instead of having your own agenda. Convincing the dog to go toward the trigger is not recommended in BAT 2.0, even with Mark and Move. Even walking toward the trigger before the dog walks that way is generally to be avoided. This is especially important to watch for with Mark and Move, where you tend to have treats on you, which can lure the dog foward.
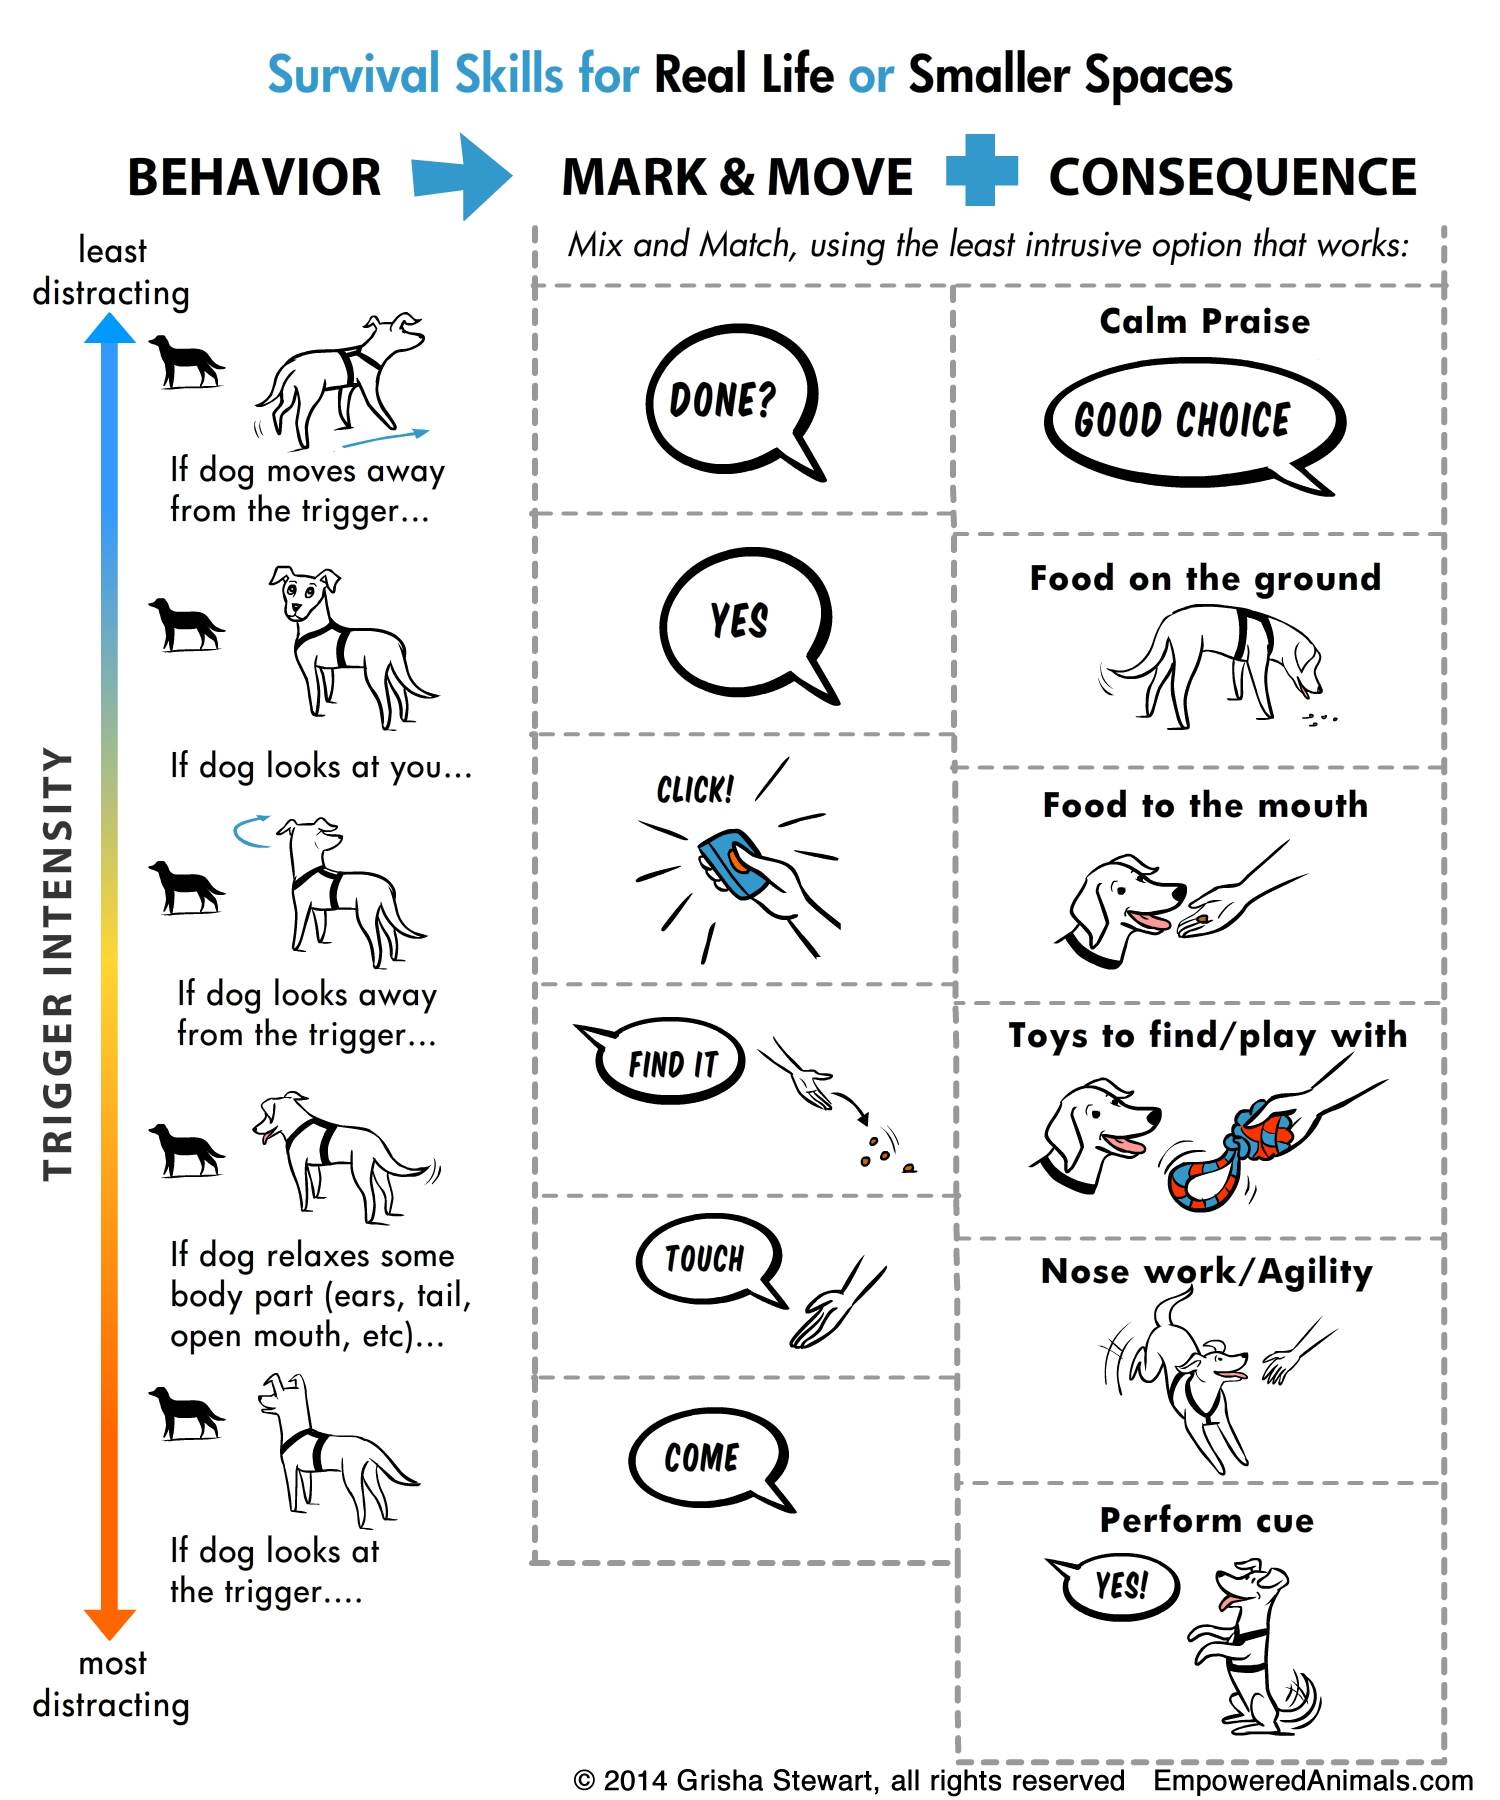
1. Behavior
When your dog notices a trigger, assess which of these your dog can do on their own without freaking out (that’s the technical term for ‘can do while the heart rate is steady or slowing down to normal’):
- Body turn away from trigger
- Head turn
- Look away
- Blink, ear twitch, etc.
- Look at trigger is enough!
As your dog does these behaviors, <strong”>mark and move away from the trigger, and then reinforce with something (I’ll talk more about how to select your reinforcer later). The least intrusive thing to do is to let your dog process the trigger on her own, so waiting until she turns her body away is great. But she may not be able to do that with this trigger, at this distance. If you think there’s even a 1% chance she will start getting more excited instead of being able to turn away, mark something smaller. The list above is rated from most to least responsibility for the dog (also most to least empowering). When in doubt, pick something lower on the list, but just know that the goal is for the dog to do this all on her own, so go higher on the list if she’s ready.
2. Mark
The marker you use is also important. You can just pick the same one every time. If you are more advanced, use the same rule as above and pick the least intrusive marker.
Examples (in order from least to most intrusive/distracting):
- “Done?”
- “Yes”
- Clicker (or hand flash for deaf dogs)
- Cue (Touch, Come, etc.)
Any of these markers work well in the moment, but a cue or a clicker grab the dog’s attention in a big way. That’s great when you need it, like when a trigger suddenly comes into view or you have construction workers in front of your home. The clicker simultaneously marks the behavior and brings the dog back to you for the reinforcer. <strong”>But then you still have the dog’s attention for a good while afterwards. You become the center of her universe, so she is missing out on a chance to notice what’s going on in the environment. So use the marker that is just at the right power for the moment. Don’t use a hammer when a flyswatter will do.
3. Move!
After you mark, be sure to move away whenever you can. If you are using these tools, it’s because you are too close to just let your dog wander around and check things out. If you have great treats, your dog will stay wherever you are to eat them, but that doesn’t mean it’s the right thing to do. Staying in one spot puts your dog in conflict. He wants to go, but he wants the treats. Make it easy on him by moving away and then treating. It also has the bonus of teaching your dog to move away fro the trigger in a happy and controlled way (not fleeing, but not charging toward the trigger, either).
4. Reinforce
Moving away was probably already a reinforcer because you’re in survival mode, but adding another “bonus” reinforcer is a nice touch and useful to keep your marker strong. Again, we want to choose a reinforcer that’s not too strong for the situation, drawing all of the dog’s attention to you.
Examples:
- Praise
- Petting
- Food treats
- Toys
- Activity (jump up, Find It, agility etc.)
Every dog is different, but that list is approximately in order for how distracting it is to your dog. The more distracting it is, the less attention he has for the trigger.
As a general note, it’s better to err on the side of being TOO distracting. Being relatively relaxed around the trigger is the most important thing. If that means your dog doesn’t have a chance to even see the trigger because he’s so distracted, that’s okay. It’s better than freaking out and barking, because that will have a negative effect on the rest of your dog’s experiences that day. That said, if you are confident that your dog is capable of looking at the trigger and turning away on his own, then he can learn more from that encounter.
Note: Mark and Move can be used whenever you need it. That includes walks and in set-ups where you can’t move far enough away. If you are familiar with the older version of BAT, Mark & Move is similar to the “Stages.” Just make sure that you still let the dog be in charge of moving forward, with you as the brakes to keep him from getting too close.
Don’t get in the habit of doing BAT the old way, by moving away and then suggesting the dog forward again. Wait for your dog to be the one to initiate movement toward the trigger and try to have movement be in a natural set of curves, not a straight line at the trigger. And whenever you can, use the regular set-ups, discussed in the next lesson, rather than Mark & Move. It’s a survival skill, with less learning for the dog, but more control for the person.
Please do not share this image or post online 🙂 It is available in the Ahimsa Manual.
[/s2If]