[s2If current_user_cannot(access_s2member_ccap_course_002_bt)]
To view this lesson, please purchase this course or log in if you have already purchased it.[/s2If]
[s2If current_user_can(access_s2member_ccap_course_002_bt)]
Week 2:
- Body Language: when to stay out of the way and when to jump in to help
- Find It
- Equipment for working with reactivity
- More leash skills practice – with your dog
- Assess video posted online
BODY LANGUAGE
When you do BAT, it’s important to be able to understand and predict as much of your dog’s behavior as you can. This is actually true even if you aren’t doing BAT, too, so a nice benefit of doing BAT is that you will be able to learn more about what your dog is doing. When you can’t predict your dog might do next and you have no control over the situation, it’s scary and when it’s scary, people tend to use techniques that aren’t necessary.
For example, let’s say that your dog barks and jumps out at a child as you walk by. You might be embarrassed or scared. Because of previous training, self-preservation, or something you saw on TV, you might give the leash a quick pop or even lift the dog in the air. You might pin him to the ground in an attempt to teach him not to do that next time.
Unfortunately, that type of training can backfire and the dog can get much worse instead of better, like turning to bite you when he feels pressure on the leash. It might just teach your dog to ‘lie’ to you by eliminating the warning signs (like growling), so he holds it all in and then bites out of the blue one day. Even when it ‘works’ you might be creating an adversarial relationship when what you really got a dog for is companionship.
On the other hand, you might be savvy enough to know that you can prevent a reaction by talking to your dog or giving him a treat whenever he sees children, so that he starts to look at you instead of worrying about the child. That’s certainly an option and something you’ll keep in your toolbox. It won’t be something you need during your BAT set-ups, but it may still come in handy on walks.
The good news is that whether you have tried the first techniques described or the second one, the observational skills you used so far will come in handy.
BAT gives dogs more responsibility for their own actions, with natural consequences, so that we don’t have to micromanage all of the time. What we do need to do is read our dogs’ subtle body cues to know when they need to be left alone to learn and when they need to be helped. BAT gives dogs a safety net without taking away their opportunity to learn naturally.
In more old-fashioned training, the handler is looking for the moment that the dog does the ‘wrong’ behavior in order to punish the behavior. So when you see your dog close his mouth, start to bark, or even look at the other dog, that might be the time you would have given a correction. It is still important to recognize such moments, but we will interpret them differently.
In BAT, you’ll carefully arrange your training sessions so there is no lunging, barking, etc., but sometimes it happens. If you do see something going ‘wrong,’ it’s not that the dog has made a mistake, it is that the set-up is too difficult for him. Your role is totally different than it was before, but your quick response is just as important now. Think of yourself as the lifeguard and you see your swimmer start to flail and drown. You won’t wait for their head to go under and then yell at them.
At the earliest moment that you see that the dog is no longer able to handle the situation on his own, encourage your dog away from the trigger and back to a place where he’s able to stay relaxed without your help. One of the skills that you will take with you into a BAT set-up is the patience to not interrupt the dog when he’s doing well. If you arrange the situation carefully in advance, you will get a lot of opportunity to let the dog figure things out on his own.
On the other hand, if you are used to feeding your dog just after he sees a trigger, then you have been looking for the moment of connection with the trigger. It’s good that you can recognize that moment and see it as a positive thing. With BAT, you’ll now be working without the food, most of the time, so you will probably need to be much further away.
We want the dog to be able to notice that the trigger is there and move on without your help. You’ll have to contain yourself and not always interrupt the moment that your dog sees the trigger. If he’s relaxed (tail neutral, breathing normal, muscles soft, body at an angle instead of pointed right at the trigger) then just take it in and move on. This is where some of the desensitization happens, meaning that your dog has a chance to take in information and move on at his own pace. One of the skills that you take with you into BAT is the knowledge that we have to set the dog up to succeed.
In the illustration below, the water represents the stress level and the dog’s ability to relax himself. As she goes deeper into the ‘water’ your dog will need more help. When she is on the shore, she needs the space to learn without micromanagement. We want the dog to stay in the Green and Blue areas at all times. I’ll give you tips on what you can do in each of the colored areas, but read through this chart just to get a feel for how the body language changes as the dog gets more and more excited/stressed by the trigger.
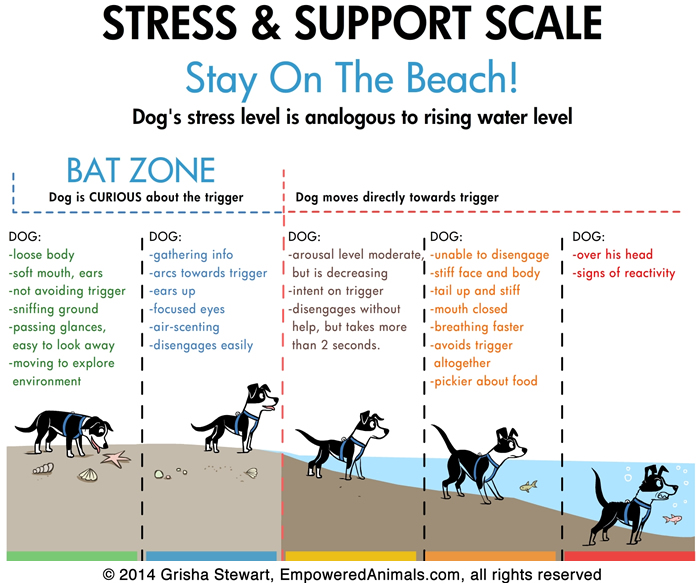
In this picture, the shoreline is what I’ll refer to as the threshold. Your dog is over threshold if he needs some help from you in order to move on. We will say he is below threshold if he is doing the behaviors in the green area (dog is not avoiding trigger, he knows where the trigger is but is not bothered to give it more than passing glances) or the blue area (dog cares and may need to get some information but he is able to easily move on).
Think about situations in the past where your dog has been in each of those colored areas. Don’t worry too much about splitting up yellow, orange, and red, unless you are a trainer. The important part is the line between whether you have to do something or the dog can handle things on his own.
Watch these two videos. At one point in the first video, the dog enters the ‘blue zone.’ Look for it! In the second video, There is a spot where the dog is near the yellow zone, but I still consider it blue zone because the dog is able to turn away on his own in a reasonable time, without prompting.
[vc_video link=”https://vimeo.com/135901022″]
[vc_video link=”https://vimeo.com/135894169″]
Combine your understanding of the ocean chart with Leash Skills:
The leash walking skills that we have practiced are designed to help us stay in the green and blue zones. They can also be signs that your dog is having trouble during your set-up. If your dog doesn’t easily respond to the Slow Stop during a set-up, for example, then you are working too close to the trigger.
This week, practice doing the leash skills in an area where it is easy for you and your dog. If they aren’t working, you are either not doing them correctly (for example, you are pulling on the dog instead of doing pretend pulling with the mime pulling), the area is not interesting enough for your dog to explore with his nose, or the area may have too many triggers.
[/s2If]