Click to learn how to do the Monthly Challenge.
Note: August, 2015 is sponsored by Dogwise.com! Two randomly selected ABBA members who do the Challenge will get a $20 Dogwise gift card. Use hashtag #ABBAaugust2015 in your Facebook posts.
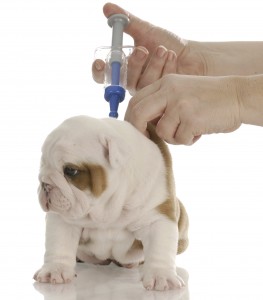
Your dog can actively cooperate in a blood draw, not just hold still with restraint.
What does your situation look like now?
- Does your vet tech hold your dog down so another technician can get to a vein?
- Does your dog bite the vet tech, or try?
- Does your dog shiver and shake from fear at the veterinarian’s office?
Whatever can be changed, come up with a goal for that and apply most of your pet’s calories and other reinforcers toward achieving it. Follow the guidelines of the Monthly Challenge to keep yourself motivated.
Tip: Teach your dog a More Please Signal, which is a way to say that he is interested in continuing the training.
Tip: Get a syringe (with no needle or with a cap on it) from your vet’s office or a drug store. Training using counterconditioning: just after you do something to your dog, he gets a fabulous treat/toy/massage. Start small and gradually end up being able to do a full blood draw.
Tip: Have your vet use a butterfly needle (the smallest kind). They can often take blood from the back leg as well, if that’s easier for your dog.
Here is a video clip of Peanut doing a jugular blood draw and another clip of training that we did right afterwards (these appear for members only). Whenever you do the actual draw, immediately follow that up with more of the training that you did in the first place. So 99 times out of a hundred, there’s no actual needle stick. Notice that because of the training, he is willing to go back for more. This video was shot one month after training began, and I trained about 3-5 times a week for maybe 10-15 minutes each time. Before the training, he would shiver and quake. And he’s 12 years old, so senior dogs can do this, too![s2If current_user_can(access_s2member_level2)]
[vc_video link=”https://vimeo.com/135269415″]
[vc_video link=”https://vimeo.com/135269416″]
I trained for a jugular draw, but you may be better off training for the back leg.
General steps I used (use more if your dog needs it):
- Car wash (teaching the dog to come between your legs, facing forward). I just lured, starting with treats in both hands and then in just the final hand to feed in front. Click and treat right as the dog gets in position, and make sure he exits out the back, to avoid tangling and also avoid moving toward the vet afterwards.
- Car wash then became my More Please Signal. If he got into that position then I touched his neck with the syringe, then treated. Just bringing the syringe out got him a treat at first.
- My husband practiced doing car wash.
- Once that was going well, I became the ‘vet tech’ and pretended to do blood draws, adding more pressure from the syringe sometimes. Also practice holding your finger to where the blood would be coming out. Build up to doing that for 10 seconds before releasing the dog on cue.
- We switched and John was the vet tech.
- I practiced in different rooms, especially where the blood draw would take place. I was lucky to have an in-home vet, but you also should practice at your vet’s office.
- On the day of the blood draw, we did several warm-ups with the vet without a needle.
- The only time you may actually need to restrain at all is when the needle is in and also you need to keep your finger on the injection site for about 5 seconds afterwards, while you wait for the blood to clot. But with training, your dog is doing most of the restraint himself.
[/s2If]
Blood draw information:
- Blood collection sites
- Video of how to do a blood draw from the back leg (for vet techs, to give you an idea of what’s needed)
Useful videos from the Member Library:
- Empowerment:How to Build Cooperation and Trust
- 10 Ways that Your Pet Says “I need space”
- 10 Ways that Your Pet Says “I’m OK”
- Watch This Before Petting Another Animal!
- Problem Solving 101
- The More Please Signal Will Change Your Pet’s Life
- July 2015 Pro Q&A Expert: Louise Ginman (Cooperative Care & Zoo Training) (pro members)